Sabtu, 14 Januari 2012

How To Use Zoom Blur To Add Action In Your Photos


 Most of us own a zoom lens of one type or another. While I have no specific stat, I’ll say 98% of us do. It seems like a good number and might even be low.

With nearly all of you armed with this type of lens, let’s take a look at a fun way you can add action to your photos. The technique is actually quite simple but takes some practice to master. It is known as zoom blur; blur caused by activating the zoom feature on your lens while the shutter is open. NOTE: While the same effect can be achieved by physically moving your camera closer or further from a subject while shooting, we’ll stick with the zoom feature in this post.
There are three factors that are most important when using zoom blur:
  • Where you start the blur (zoomed in or zoomed out)
  • How much zoom travel
  • How long you spend with the shutter open

Where You Start The Blur

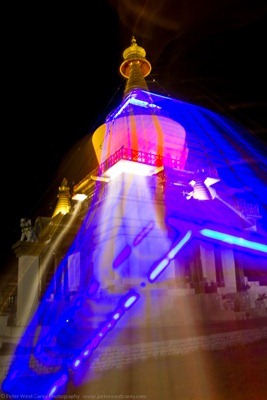
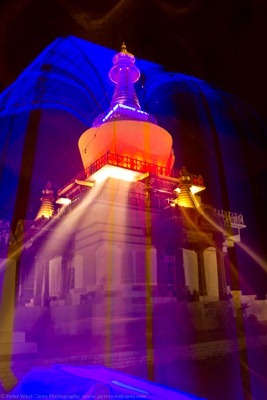
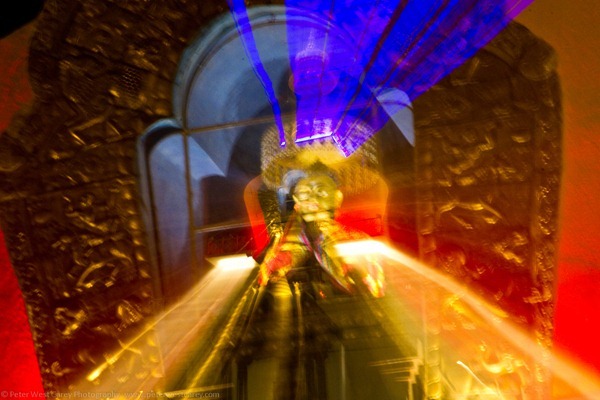
Where you start has a big impact on the outcome of the photo. You can either start zoomed back or zoomed in. My preference is typically to start zoomed out and I’d suggest it for anyone starting out. The reason is it typically allows for the clearest image of the subject before the zoom blur is added. It also gives more of a feeling of the object moving away from the photographer. Here by example, are two different shots of the Memorial Stupa in Thimphu, Bhutan. First, going from zoomed in to zoomed out. (Click on each image for a larger version.)
PeterWestCarey-Bhutan2011-1027-8718
This image is dominated by the golden frame around the statue as compared to the full stupa in which is sits. This is mostly due to the shutter length (1.6 seconds) and spending more time zoomed in than in transition. For a second example, this shot was started zoomed out and then, using a tripod, I zoomed straight in.
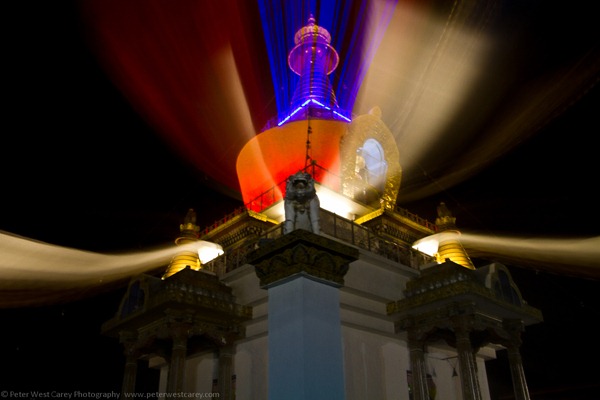
PeterWestCarey-Bhutan2011-1027-8741
This shot was 2 seconds long and I allowed more time at the beginning to burn in the stupa image before zooming in. Allowing more time toward the main subject, versus time spent zooming, will allow your main subject to stand out more.

How Much Zoom Travel

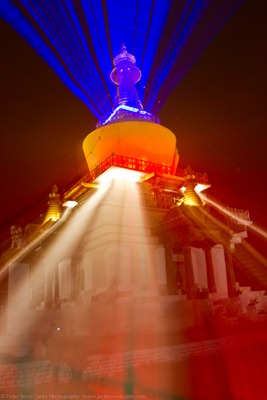
Next, it matters how  much you zoom while the shutter is open. For the shot above, I wanted the lights to extend all the way off the screen. But it didn’t quite work as too much light filled the screen for my liking, obscuring the  stupa. Instead, I decided to zoom only part of the way in, hoping it would allow for more of the scene to be visible. I also started further zoomed in to see more of the base of the stupa.
PeterWestCarey-Bhutan2011-1027-8728


I am also helped here by the center point of the zoom being lower than the brightest lights. This helps when the scene is brightly lit and the light can have a tendency to wash out areas of the subject. For instance, the statue in the center is not blurred because the zoom was fast enough to not let too much of its light be exposed.

BONUS TIP: Give It A Bit Of Movement

Especially when dealing with lights at night, adding in a bit of movement can give some interesting effects. For instance, in the examples below I panned slightly up or down to change the path of the blurring lights.

PeterWestCarey-Bhutan2011-1027-8742
PeterWestCarey-Bhutan2011-1027-8736
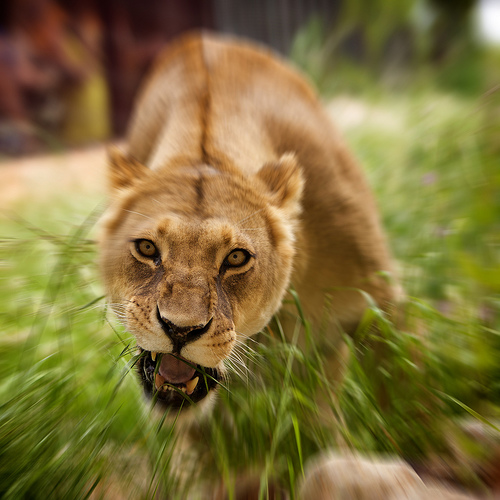
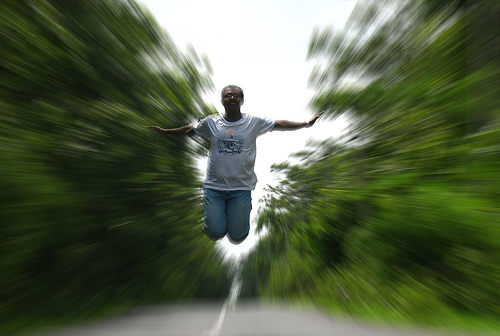
I will be the first to admit these images aren’t stellar, put-on-a-magazine-cover images. They’re about experimenting and having fun. At times though, with practice, zoom blur can produce some remarkable results as seen in the examples below from Flickr.
Copyright Ernst Vikne

Copyright Balamurugan Natarajan
Copyright Heather Wizell

Shooting Products and Video Using Home Depot Lighting

We had a very tight budget, and I had recently done a behind the scenes video on creating and lighting a unique scene with just Home Depot lights. So, I thought why not do the same thing for the ONE project.

Final Result Samples


Samples from the final set of stills – Shot sRAW on 5D Mark II w/ 50mm @ F/4

The Setup

Step 1 – Flooring and Wall Tiles ($1065 Total cost)

The first step was setting up the flooring and the wall tiles. Interestingly enough, this was actually where the majority of our budget was spent. But, we figured that we would be using this set in future videos, so it wouldn’t be a one time cost.
The entire space is 10×10 feet. So we purchased 100 square feet of wood flooring tiles from Home Depot (which cost around $200) along with 200 square feet of Seesaw Wall Flat tiles to cover both walls. For some reason, these cardboard molded wall flats cost $86 per box and it took 10 boxes to cover both walls. So, yeah, that is where the majority of our budget went as it cost $860. To the attach them to the wall, we simply used 4 pieces of double sided tape per tile.

Step 2 – J.C. Our Lighting Dummy

Whenever I am doing scene setups, I place a lighting dummy where my subject is going to be in order to shape my light. It isn’t reasonable to have a person stand in for 60 minutes as I sit there and mold and shape our light. So, I pop in J.C., our lighting dummy, to give me a nice example of how the lighting is changing as I add and modify each light.

Step 3 – Wiring the Set ($50 in wires and strips at Home Depot)

Concealing cables on a set is always a challenge, especially when you are shooting wide. Luckily, in this video we didn’t shoot wide enough to see the flooring. But, for future videos I knew that we would. But, with the wood tile floors we had a simple solution, we simply ran the cables behind the tiles along the edge of the wall then pushed the wood flooring against the cables to pinch and conceal it against the wall.

Step 4 – Husky Daylight Work Lights ($50 each at Home Depot)

We used two Husky Florescent work lights as uplights to bring out the texture of the wall tiles. We used florescent daylight temperature lights because we wanted the background to be a nice shade of blue, while we white balanced to tungsten that would be used on the subject.


The image above shows the placement of the uplights on the floor. Each is evenly spaced from the corner of the set.

Step 5 – Workforce Tungsten Work Light Stand ($35 at Home Depot)

The next light in our setup is a twin head Workforce Work Light light which we use as a rim light on our subject off camera left.


While using work lights is cheap, there are downsides. Some of which include the heat, the lack of power control, as well as directional control. While we can’t change the first two, we can change the direction of the lighting. To prevent the tungsten light from hitting the uplit walls, I added on a little cardboard GOBO (Go In Between Object). Don’t worry, the light doesn’t get hot enough to burn the cardboard, though just to be safe, I wouldn’t leave the set turned on while I went to do my grocery shopping.

Step 6 – Workforce Tungsten Work Light ($15 at Home Depot)

To define the right side of the subject, I added an additional tungsten Workforce light to camera right.

Step 7 – Tungsten Modeling Light (Can use the $35 light used above)

Since we have modeling lights sitting around the studio, I didn’t need to spend more money on the work lights for our set. So, while we are using a modeling light as the main light, this would look and work exactly the same with the dual light stand used above. The benefit to using a modeling light is that I have a nice little barn door to easily control the direction of the light.
This light is placed directly to camera right and is used as the main light on our subject.

Step 8 – Softening the Main Light ($30 Scrim)

To soften our main light, we are using a standard scrim out of a simple silver reflector kit that can be purchased for $20 – $30 pretty much anywhere. The purpose of softening this light is to prevent hot spots and shine on the subjects face. This is particularly useful as our set is getting quite hot (literally) because of the amount of tungsten lights in close proximity. So, keeping that main light soft is going to help conceal any oil/shine on our subjects face.


The scrim is placed on a stand directly in front of the main modeling light as shown above.

Finished Set


With the ambient room lights off, you can see the final look of our set above. At this point, we are ready to bring in our real subject, and make a few fine tweaks with the light positioning in order to adjust the exposure and any stray bits of light.
Hope you guys enjoyed this little behind the scenes look. To check out this behind the scenes video as well as our other tutorials be sure to subscribe to the SLR Lounge YouTube Channel.

Jumat, 13 Januari 2012

5 Tips To Transform Your Photography With Long Exposures


Employing long exposure photography techniques is a great way to create an image that makes others go “Wow!”.  If you’re unfamiliar with long exposure photography the major ingredient needed is low light conditions, which will require your camera to expose for longer periods of time. In fact it’s even possible to use filters to reduce the amount of light that comes through your lens so as to produce long exposures even during the brightest times of day.  Long exposures enable photographers to create an abstracted or surreal visual experience as opposed to reproducing a scene as we might see with our naked eye. In this regard long exposures allow you to artistically create something from a subject or scene that might otherwise seem ordinary with more standard photographic techniques.  With that in mind here are 5 tips to transform your photography with long exposures:

1. Create Atmosphere

Use long exposures to create an ethereal atmosphere. Weather conditions are often thought of as static, but in reality they shift and change slowly.  In many instances these changes occur too slowly to be held in our visual memory, but our camera can record these changes. Misty, foggy or smokey scenes can be created with moving clouds, surf, etc.

2.  Discover Hidden Movement

We are often so rushed that we seldom pause to take note of slow moving subjects. Once you start to look for slow moving subjects you quickly open a door to a new world of photo opportunities. Clouds, shadows, stars, plants and even people or animals make great long exposure subjects.

3. Create Using A Canvas of Light

While your camera shutter is open your sensor or film is in essence a canvas. Normally that canvas is open very briefly but with longer exposures the light running over your sensor acts a brush. If you let a scene unfold before you with your shutter open it is “painted” onto the sensor yielding blurs of light. If you work in an environment where there is little light you can manually paint light into a photo with strobes, flashlights, cell phones, etc. to create a unique image.

4.  Alternate Reality of Color

Back in the days of film there was a phenomenon where the color in your image could shift in long exposures from reciprocity failure. Different film types would experience reciprocity failure at different exposure times and produce varying types of color shifts. For many photographers these color shifts were seen as something to avoid, but many artist have employed this phenomenon to create very neat photographs. If you’re still shooting film this may be something you want to experiment with. If you’re shooting digital you can get color shifts by creating or using pre-made presets in Photoshop or Lightroom.

Note: This was taken with Fuji Velvia film whose reciprocity characteristic is to shift colors toward green hues.

5. Photograph the Ordinary to Make the Extraordinary

When you show someone something new that is under their nose all the time it reawakens their interest in it. Highlighting one or a combination of the visual effects previously discussed with long exposures of ordinary scenes will catch eyes. To find that eye catching photo you’ll need to experiment though as the net effect(s) of a long exposure may not be apparent until you view it.

Kamis, 12 Januari 2012

Wedding Videography Package Advice and Tips

 Have you ever found the options on a wedding videography package to be confusing and too technical. Well here is a general breakdown of most of the categories you will ever have to deal with (use the navigation to the right to skip ahead). This way the next time you look over wedding video package options, you can make an educated decision as to whether the services are worth the price

Cameras

Wedding Videographer Silhouette

"I don't want the videographers to miss anything, but it how much should I pay for extra cameras and videographers?"

If you find yourself asking yourself this question, you are not alone. The truth is that there is no way to know because each videographer and videography company is different. This is a list of the various factors that determine the type of coverage that you receive:

Style of Cameraman

This is the most important aspect of determining the quality and quantity of your wedding footage. As you watch one sample wedding video to another, pay attention to the aspects below to see that style they have and which style you are willing to pay for (note that the negative and critical connotations are for humor and a more human understanding):
Tripod Abuser
One thing that I feel has disgraced the profession is the multitude of videographers that are glued to a tripod. Tripod use (or abuse) has its purposes, which includes steady shots and smooth horizontal panning. But this is best for scripted footage, such as having actors and preplanned shot sequences. Many professional videographers are well-versed in this, but also have the ability to remove the camera from its anchor and get quality footage the is only attainable on foot. Honestly, anyone with one day of training can use a camera on a tripod efficiently and skillfully and I do not believe this justifies a $50 to $100 per hour pay scale.
The Running Man
Be wary of the fact that even though a tripod makes the footage stationary, not being anchored to one can mean that the videographer is running back and forth to get other shots. This may be distracting to the ambiance of the ceremony or reception and should be of concern. If you prefer the better footage with a great videographer, you might want to compromise and ask him to be less noticeable or distracting. My personal style is candid, where I often find great places in the background.
The Director
This can be a good thing and a bad thing. This is also seen in the best of photographers and the worst of photographers. I have been unfortunate enough to have seen wedding videos where the videographer barks orders and the whole thing is caught on tape. "Smile! Turn that way! Good!" Please avoid this at all costs. If a videographer is good at scripted shots, you will see the results in the sample footage. Some people can see it in the faces of the bride and groom unfortunately, unless they are great actors. This is why I prefer to use a hands-off approach to get natural and candid shots that reflect the actual joy they experience on their special day. This, however, will not yield any scripted sequence and this is an issue described further in the editing section.

The "2 cameras, 1 videographer" option

This means that one camera does not move. This is good as a backup to get footage at other parts of the wedding, but you really have to see footage to see if they use this effectively. If the editor cuts back and forth to the same frame, it may not be to your liking. Also, the backup camera ("B" camera) is usually one that costs less that $1000 (while your cameraman may be using a $4000 camera) and this is most noticeable when edited with the better footage from the "A" camera. I move around and get enough shots from multiple angles where having a "B" camera is not necessary.

New Toys, like the Button Camera

These are fun and great, but just make sure that it is worth it. See footage that actually uses the new gadget and see if you want that in your video at all, since the small cameras provide surveillance-style footage and the whole "Blair Witch" shaky-cam effect. Also, be wary of the fact that the groom may have to wear the camera (which is not that big) and the transmitter (which is not big either, but can get annoying for more than an hour at a time). If you like the feature and understand the pros and cons, I say go for it.

Sound

Wedding Package Sound
One option or feature that you may see on a wedding videography package list or brochure is the use of "wireless microphones." This brings sound into the picture. Many people do not realize how important audio can be to the video, since what good is it having your best man speak words from the heart to the camera with "YMCA" peaking the audio. Again, see actual footage of actual weddings to see what you will get, especially in loud situations such as the reception and important situations such as your vows. Ask the videographer if he is prepared.
One example involves a wedding where the altar was in front of a water fountain, of which the venue forgot to turn off as the bride and groom said their vows. My audio was drowned out by the constant pattering of water. Luckily, I was able to pull most of the audio out with effective sound editing and proceeded to buy a wireless lavalier mic the next week. A lavalier microphone is the type of microphone used in interviews, usually attached to the lapel. Grooms tend to dislike carrying the transmitter, so I alternatively place it somewhere near the altar. This also provides two audio streams where I, as the editor, have the option of choosing the clearer of the two.

Editing

Many videography studios will charge extra for special effects, slide shows, and highlight reels. Again, take a look at final products to see what you are buying. Many editors are not professional editors, using purchased templates to make their final product. This often results in a "cheesy" feel (I have permission to use that word because my clientele prefer to avoid "cheesiness" and use that word commonly). Be wary of paying for special effects where it takes 20 minutes of work to plug in footage into a template.
Music video styles can vary between great and downright horrible. Often, footage is clipped and just played to music in the background. If they take it one step further they will sync the clips with the beat of the music, often with transitions that may or may not please you. Many editors get plug-in packages that include wedding video transitions, for example the video clip morphs into a wedding ring and zooms off. This can cause what I call "effect overkill" and is the result of the person trying to let the editing program's options make the video good by including every possible feature. Here and there you will see photographers do the same, though it is generally tolerated less. A real, professional editor can make the footage look good with simple cuts and then adds special effects to carefully add emphasis to certain moments. Look at any movie that is done well. Most of the cuts and transitions are straight cuts or fade transitions that are well-placed.

Delivered Product

The style of a DVD case is often representative of the dedication and style that the studio has for its videos, though I would always say to not judge a book. However, the printing of the DVD is important. Adhesive labels will peel off in the years to come and may damage DVD players. The alternatives are inkjet-printable surfaces, which allows direct printing on the DVD. This isn't as good as silk-screening, but silk-screens (used on the DVD movies you buy) are expensive and meant for printing thousands of DVDs.
Make sure that you know how many videos you will receive and how much it will cost to get any extra copies beyond that. Also, see if you able to copy the DVD. I only charge for extra DVDs due to time and materials and I allow my clients to copy their video as much as they like. If you have the option of getting the video hosted on a website, find out if there are any extra costs and for how long the video will be hosted for (some places only offer this service for six months). Here is an explanation of my wedding video DVD covers and printing.

Extras

Extras, like a love story option or slide shows, are great. Just remember that some places offer extras to make easy extra money, while the true purpose should be to give the client flexibility and options to satisfy personal preferences. See if the price justifies the service. It's like getting air conditioning (when it is not included) with a new car; it gives the seller a chance to increase revenue on top of a closed sale. Explore the options and flexibility of a videographer, although. It shows skill and talent to be able to cater to each unique client.

Pricing

The truth: Many studios take advantage of the insane markup on wedding services and price accordingly. The best advice I can give is to pay for talent and skill. Expensive video equipment and pre-paid editing templates do not always justify a budget-tightening price. Many places are run by businessmen that hire amateurs. . This does not justify the cost by a long shot, but it allows the studio to have several offices and spend large amounts on advertising and marketing.
So when you are looking at wedding videography package options, try to see what they actually offer beyond flashy terms and "fluff." Many things should come by default with a wedding video montage. Be wary of when things are waved around like a banner (like "including 20 special effects") when they have little bearing on the caliber of the production. The best advice I could give is to look around and weigh the price for the end product. Always see actual weddings, instead of flashy promo clips that do not reflect what you will show your loved ones in the years to come.

10 Secrets to Shooting Great Wedding Videos

Have you wanted to use your camcorder and video equipment to make some money, or are you already shooting live events? Shooting and producing wedding videos is a great way to profit from your equipment and experience. Whether you’re just entering the videography field or looking to add wedding videography to your list of services, these 10 insider secrets will help you produce professional wedding videos, right from the start.
Excerpted from The Video Guide to Professional Wedding Videography

1. Choose the Right Gear.
Video equipment becomes obsolete very quickly because of the constant advancements in technology. You don’t need the highest-end gear to shoot great wedding videos; the basics will do just fine. The basic equipment that you’ll need to shoot wedding videos includes a fluid head tripod, remote microphone system and an audio mixer. Oh, and a digital format camcorder, of course.

2. Back up your audio.
Audio for wedding videos can be touchy. Remote microphones may pick up some voices better than others and last minute glitches could prevent you from getting any audio at all. This is why many wedding videographers are investing in Sony Mini-Disc recorders to back up their audio. The recorder allows you to back-up your audio from the ceremony and the reception. The MD recorder is easily carried in the groom’s pocket, with a lavaliere microphone.

3. Understand LUX Ratings.
LUX is a measurement of camera sensitivity that is important to consider when purchasing a video camera. Cameras with lower LUX ratings produce better video in low light situations than cameras with higher LUX ratings. For wedding videography, which most often takes place in low light situations; churches, synagogues, reception halls, it is necessary to use a camera with a low LUX rating. The more sensitive to light your video camera is, the better quality wedding shots you’ll get, and the more professional the finished wedding video will be.
4. Attend the rehearsal.
Unless you can attend the wedding rehearsal, you probably shouldn’t book the job. Attending the rehearsal and planning ahead can easily avoid problems with lighting, microphone placement, and blocked views. The rehearsal also gives you another chance to consult with the bride and groom. Any last minute requests for their wedding video that they, or you, may have can be discussed before the wedding day rush is on.

5. Get “B-roll” coverage.
“B-roll” (which stands for”Before-Rol”) coverage is of critical importance to the professional quality of your wedding video production. To get B-roll footage, simply use a tripod to take exterior shots of the building in which the event will take place, stained glass or other architectural features, the food and flower arrangements and any other special touches you notice.
In addition to these still shots, begin videotaping about 20 minutes before the wedding is to begin, in order to get shots of the guests being seated, and audio of the music played before the ceremony.

6. Test your audio.
Testing your audio before the ceremony is the best way to avoid common audio problems. To test your audio, make sure to arrive at the wedding location at least two hours early, in order to set up your equipment and check it out, and have time to fix any problems that you find. Another good tip is to monitor the audio with your headphones to be sure that it has a professional quality.

7. Concentrate on close-ups.
It is extremely important to get close-up shots at the wedding. Close-ups make your images look sharper and they allow you to capture emotion in your wedding video. Be sure to get close-up shots of the bride and groom, the wedding party, and the parents throughout the wedding and the reception, and use them frequently.

8. Anticipate and follow the action.
In order to shoot a professional wedding video, you must anticipate and follow the action throughout the wedding, especially if you’re doing a one-camera shoot. You only get once chance to capture the action at a wedding ceremony, be prepared for whatever is coming. Talking to the couple and attending the rehearsal ceremony will help you to know what’s happening next, and your camera moves will be more fluid. Anticipating and following the action is key to shooting a professional wedding video.

9. Focus on capturing the event, not creating a special effects film.
There are many opportunities and options for special effects when creating a wedding video. However, special effects such as slow motion, layering graphics, and editing backgrounds work well in wedding videos only to a point. It is very important to remember that shooting a wedding video is all about capturing an important event, not creating a video with the most special effects. Remember to keep your focus on the couple, the ceremony, and the emotion of the wedding, and use special effects wisely.

10. Finish the job on time.
After you’ve shot the wedding ceremony and the reception, it’s time to produce the finished video. Make sure to allow at least a week of postproduction to finish the job on time. A week should give you time to transfer footage to your system, catch up with other possible clients, editing the ceremony, the reception, and the pre-and-post ceremonies, as well as transferring to tape or DVD and preparing the packaging. Remember that the MOST important part of post-production is delivering the finished video ON TIME. The married couple will be anxious to see their wedding video, and are depending on you to deliver it on the date and time that you promised. Your reputation, and your future clientele, depends on your ability to finish like a pro by producing a professional wedding video on time and on budget.

Street Fashion Photography Tips


Shooting five to ten street fashion brands a day in a three to four hour window is a tough call for any experienced photographer. Professional photographer Nick Fancher does this day in day out and shares with us, some of the ways he maximizes his shooting efficiency, using a lightweight kit and his own lighting
creativity in this tutorial video.


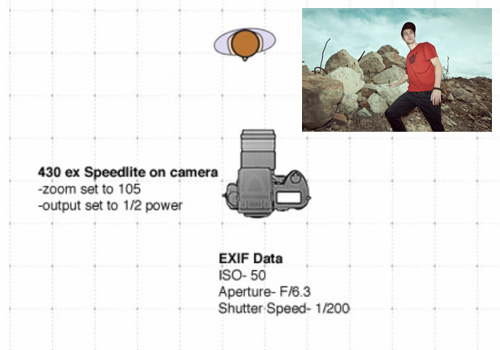
The first brand Nick tackles is Entrée, a street brand. Working on a derelict lot with harsh light, Nick is looking for a stylized look to emphasize the street look of the clothes. His setup:
street fashion lighting setup
Lighting setup to emphasize the street look
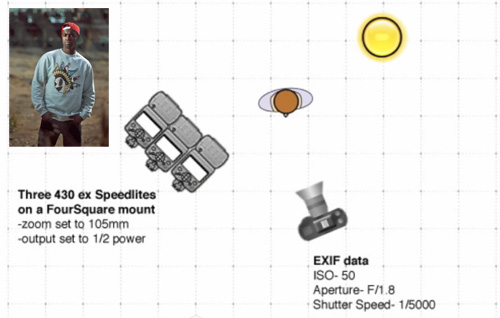
  • Three radio controlled flashes together on one stand, with the output set manually to half power.
  • The flashguns focus length was each set to 105mm to get a more direct light.
  • With the Canon’s high speed sync he was able to use a very high shutter speed of 1/5000 of a second allowing him to darken the background creating a gritty, urban look and punching out the colors in the models clothes.
  • By positioning the flashlights directly towards the sun, Nick was able to use the sun itself as a keylight and because of the high shutter speed he could use a wide aperture to throw the background out of focus.
The second brand Nick tackled was Saucony, a more sports oriented brand. Shooting their sports shoes required a clean look that was helped by a good sunny day. His techniques for this were:
shoe fashion light setup
Lighting setup to achieve a clean look
  • Shooting on a basketball court he was able to use the sunlight passing through a chain-link fence, to provide a creative shadow pattern as a background.
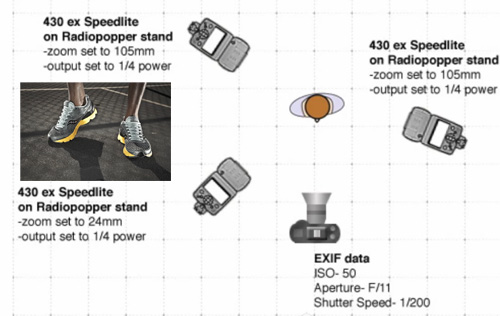
  • To emphasize the clean look he goes for a deep depth of field using an aperture of f11.
  • The shoes are rimlit from either side using radio-controlled flashlights, again set to 105mm, to tunnel the light towards the subject.
  • A third flashgun is used more or less in front of the shoes. This flash is zoomed out to around 24mm to provide a softer fill in light. The sunlight from the rear provides the keylight.
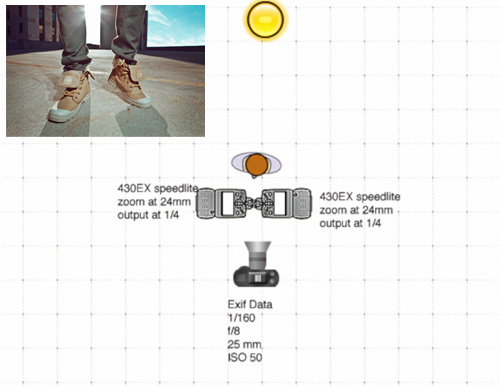
In his third shoot, Nick is tasked to photograph Palladium shoes and requires an urban look. Shooting from a rooftop, Nick uses the cityscape as a backdrop but uses a mid range aperture to soften the background and keep the emphasis on the shoes. To achieve the required look:
urban shoe lighting setup
Configuration of lighting for urban shoes
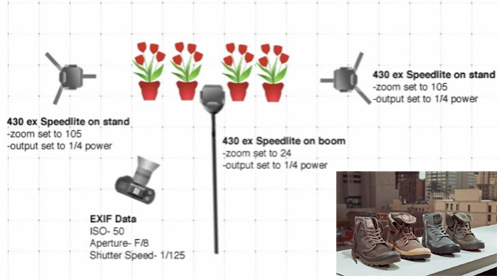
  • He rimlights the shoes from either side using flashlights set to 105mm.
  • To fill in he fires a third flash from directly above the shoes with a setting of 24mm and set manually to ¼ power.
For Palladium, he is again on a rooftop, but has two models, both of whom need to be individually lit. This time he uses just two flashes:
two model camera flash setup
Lighting two models in one shot
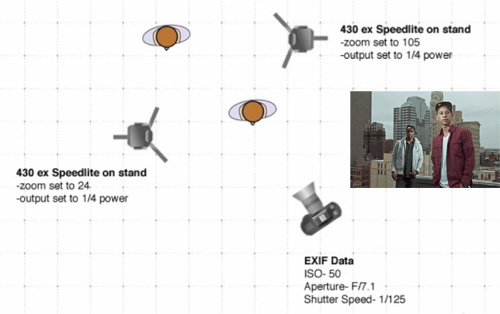
  • The rear model is lit from one side with a flash set to 105mm.
  • The front model is lit from the opposite side with the flash set to 24mm to soften its effect.
  • Using a mid range aperture, he has kept both models in focus but thrown the background out slightly.
The last shoot for Howler Brothers is shot simply with one on-camera flash:
single flash on camera
Simple on-camera flash to fill shadows
  • Dialed again to 105mm the flash punches a nice direct light onto the model with enough power to stop the aperture down, punch out the skies and saturate the colors.

In this second video we again follow fashion photographer, Nick Fancher as he packs in several locations to a four-hour shoot. One of the key aspects of lifestyle fashion photography is finding the right locations, Nick has a wide selection that he uses on a regular basis but is always on the look out for something new and fresh.>>>>

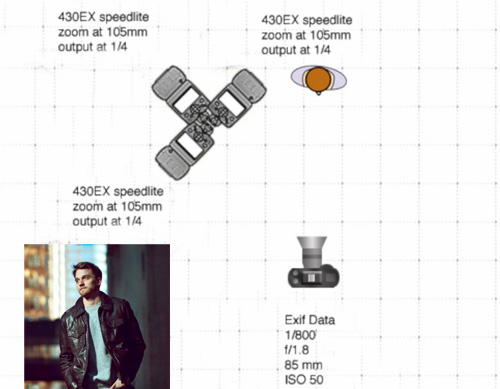
He starts his day this time with a shoot for Levi’s. Using a location as a simple as a downtown parking lot, Nick manages to find numerous interesting places to create an interesting, urban backdrop. For this shoot he uses available light at first, but to add a more dramatic look he:
dramatic light street portrait
Dramatic light street portrait setup
  • Uses a cluster of three flashguns mounted on one stand, triggered wirelessly.
  • The flashguns were raised above the model and to the side with a medium output to prevent the flashlight overpowering the ambient light.
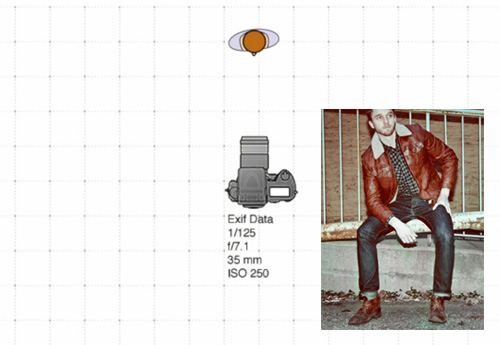
  • As a secondary style Nick reverts to a direct camera mounted flash, which combined with a gritty background has created a more “street” look to the images.
single flash with gritty background
Single on-camera flash with gritty background
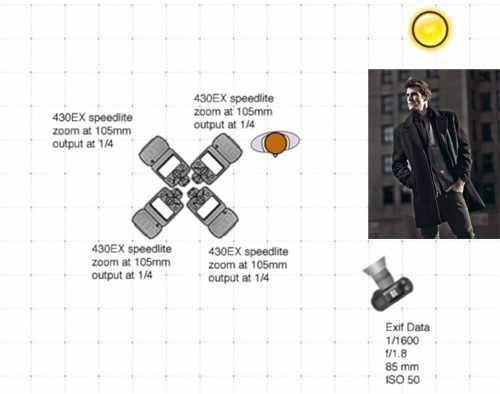
The second brand of the day was a more contemporary, high fashion style. Nick utilizes the parking lot again but this time from the top floor, where the city skyline provides a modern, urban background to the images:
contemporary style flash setup
Lighting setup for contemporary style
  • Using a cluster of four flashes controlled from a camera mounted wireless unit, Nick uses high speed sync to give a wide aperture of f1.8, throwing the background out of focus with a dark and moody feel
  • As before the flashguns are manually set to a focal length of 105mm and a ¼ power.
  • He highlights the model using low sun as an auxiliary rim light.
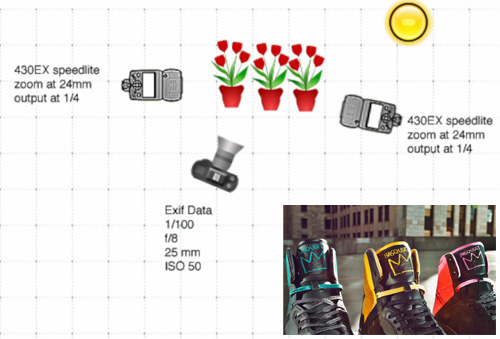
Using the same location Nick’s next shoot is of a limited edition Reebok sports shoe. To emphasis the color:
photo setup with emphasis on color
Configuration of lights to emphasize color
  • Nick has lit the shoes from either side using flash and combined the grey tones of the city skyline with a backlighting sun to punch out the color in the shoes.
  • By closing down the aperture, he has darkened the background.
Palladium manufacture, military style shoes and for this shoot Nick uses the model to showcase the shoes:
military shoe style light
Shot setup to showcase military style shoes
  • He uses the sun as a back-light.
  • Then uses two flashguns positioned in front and above the shoes and carefully maneuvered the camera to create an interesting lens flare in the background.
  • The flashes were set to 24mm to soften the front light effect.
For the final shoot of the day, Nick uses a newly built suspension bridge as a location and shoots purely with the available light from the already low sun.
So in summary, to get professional looking, street fashion images in a short time frame travel light, consider using two or three wireless controlled flashguns for flexible lighting setups. Adapt to the scene and let available light do some of the work for you. If you can, scout out great locations before you shoot, perhaps doing some test shots with a compact camera. This will allow you to concentrate your time on the actual shoot when the time comes.

Nikon D4

The new Nikon D4 digital SLR builds upon the legacy of the proven Nikon flagship D-SLRs before it, engineered to give today’s professional multimedia photographers a new apex of speed and accuracy with unparalleled image quality, low-light capability and Full HD video. The Nikon D4 hosts a multitude of advanced new features and useful functions that deliver speedy performance and amazing image quality for when missing the shot is not an option. Now available for pre-order here at B&H
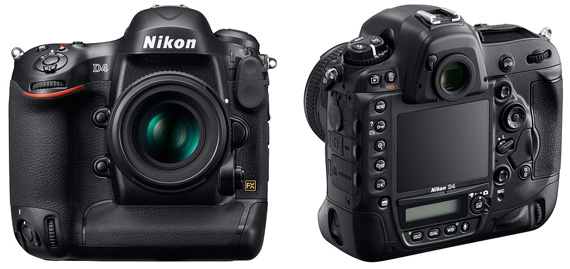
nikon d4
Nikon presents their new flagship DSLR: The D4
Every aspect of the new Nikon D4 D-SLR has been designed to emphasize rapid response and seamless operation to help professional photographers consistently capture incredible content. Nikon’s proven 51-point AF System has been further enhanced for maximum speed in a variety of challenging shooting situations, even at 10 frames per second (fps). Considered the new Nikon flagship, the D4 renders supreme image quality, a feat accomplished with a new 16.2-megapixel FX-format CMOS sensor, coupled with the latest generation of Nikon’s EXPEED 3 image processing engine to help produce images and videos with stunning clarity and color.
Photographers are also able to shoot in even the most challenging environments and lighting conditions with the assistance of Nikon’s new 91,000-pixel 3D color matrix meter and a broad ISO range from 100 to a staggering 204,800 for low-light capture like never before. The Nikon D4 is engineered for the modern professional and incorporates never before seen HD-SLR video features for those who also need to capture multimedia content from the field.
“Speed without accuracy is irrelevant,” said Bo Kajiwara, director of marketing, Nikon Inc. “The status of a Nikon flagship camera is not given lightly; this next generation of Nikon’s most professional body exceeds the needs of a wide variety of both still and multimedia professionals that rely on Nikon to make their living. Besides overall performance and burst speed, the D4 provides Nikon’s most advanced AF system to date, as well as enhanced workflow speed to give professionals the edge in the field.”
Tutorial video

Velocity Meets Versatility Speed is a necessity for today’s multimedia photographer as milliseconds matter when the action commences. Whether an assignment relies on fast processing power, burst rate, write speed, enhanced workflow or even streamlined camera controls, the D4 is the epitome of professional-caliber photographic horsepower. Ready to shoot in approximately 0.012 seconds, the new Nikon D4 can capture full resolution JPEG or RAW files at up to 10 fps with full AF / AE or up to 11 fps with AF / AE locked. Immediately before image capture, the camera interprets data from the AF sensor, including subject color as detected on the 91,000-pixel RGB sensor, to deliver consistently tack-sharp focus frame after frame. Whether a photographer is shooting a full-court fast break under gymnasium lighting or the downhill slalom in the bright sun and frigid temperatures, the D4 will instill the confidence with consistently great results.
The Advanced Multi-Cam 3500 AF autofocus system is the next generation of Nikon’s proven 51-point AF system. The fully customizable system offers users the ability to capture fast moving subjects and track focus with precision or select a single AF point with pinpoint accuracy. The Nikon D4 D-SLR aligns 15 cross-type sensors in the center to detect contrast data in both vertical and horizontal planes. In addition to detecting each AF-NIKKOR lens with an aperture of f/5.6 or lower, the camera also utilizes nine cross-type sensors that are fully functional when using compatible NIKKOR lenses and TC14E or TC17E teleconverters or a single cross-type sensor when using compatible NIKKOR lenses and the TC20E teleconverter with an aperture value up to f/8, which is a great advantage to those shooting sports and wildlife. For maximum versatility in situations such as photographing nature from afar or competition from the sidelines, photographers are also able to select multiple AF modes, including normal, wide area, face tracking and subject tracking, to best suit the scene.
The Nikon D4 D-SLR also employs a new 91,000-pixel RGB 3D Color Matrix metering system that meticulously analyzes each scene and recognizes factors such as color and brightness with unprecedented precision. This data is then interpreted and compared against D4′s on-board database to implement various settings, resulting in vibrant images with faithful color reproduction and balanced exposure. In addition, this new AF sensor now has the ability to detect up to 16 human faces with startling accuracy, even when shooting through the optical viewfinder, allowing for correct exposure even when the subject is backlit. Additionally, to capture every brief moment from a bouquet toss to a photo finish under nearly any condition, the 51 focus points deliver fast and accurate detection down to a -2 EV with every AF-NIKKOR lens.
All of this image data is funneled through a 16 bit pipeline and are written to dual card slots which have been optimized for the latest UDMA-7 Compact Flash™ cards, as well as the new XQD™ memory card. The D4 is the first professional camera to harness the capabilities of this new durable and compact format, which offers blazing fast write times and extended capacity essential for multimedia professionals shooting stills and video.

Image Quality That Hits the Mark

The heart of the new D4 is the Nikon-developed 16.2-megapixel FX-format (36 x 23.9mm) CMOS sensor that provides amazing image quality, brilliant dynamic range and vivid colors in nearly any lighting condition. By achieving the optimal balance of resolution and sensor size, professional photographers will realize exceptionally sharp, clean and well saturated images throughout the entire ISO range.
Like the D3 and D3s before it, the Nikon D4 retains Nikon’s status as the sovereign of low-light capture ability, with a native ISO range from 100 to 12,800 ISO, expandable from 50 (Lo-1) to an incredible yet usable 204,800 (Hi-4). From a candlelit first dance to nocturnal wildlife, the large 7.3 micron pixel size absorbs the maximum amount of light to excel in any situation. Additionally, the sensor’s construction features a gapless micro-lens structure and anti-reflective coating which further contributes to images that retain natural depth and tones with smooth color gradation. For ultimate versatility, photographers can also take advantage of the camera’s extreme high ISO ability while recording video.
Another factor contributing to the camera’s rapid performance and stellar image quality is Nikon’s new EXPEED 3 image processing engine that helps professionals create images with amazing resolution, color and dynamic range in both still images and video. From image processing to transfer, the new engine is capable of processing massive amounts of data, exacting optimal color, perfect tonality and minimized noise throughout the frame.
There are also a variety of shooting options available to help capture the highest quality images and video. In addition to standard NEF (RAW) files, the D4 is also capable of shooting smaller compressed RAW files to ease storage and speed up workflow. Users are also able to capture even more dynamic range with the in-camera High Dynamic Range (HDR) function that merges consecutive exposures. For deep contrast and further tonality, Active D-Lighting can also be activated during shooting for balanced exposures even in backlit scenes. Additionally, the camera features a dedicated button for quick access to Nikon’s Picture Controls, allowing users to quickly select one of six presets.
 The Nikon D4 D-SLR is engineered with innovative new features for the multimedia professional that needs the small form factor, low-light ability and NIKKOR lens versatility that only an HD-SLR can offer. The new features add functionality for those professionals looking for the best possible experience to capture a moment in Full HD 1080p video at various frame rates, providing footage that is more than suitable for broadcast.
Full HD video recording – Users have the choice of various resolutions and frame rates, including 1080p 30/24fps and 60 fps at 720p. By utilizing the B-Frame data compression method, users can record H.264 / MPEG-4 AVC format video with unmatched integrity for up to 20 minutes per clip. This format also allows for more accurate video data to be transferred requiring less memory capacity. The sensor reads image data at astoundingly fast rates, which results in less instances of rolling shutter distortion.
Full manual control of exposure – Shutter speed, aperture and ISO can be changed while recording to adapt to lighting and alter depth of field for professional cinematic results that help realize a creative vision.
Uncompressed output: simultaneous Live View – By using the camera’s HDMI port instead of the CF or XQD card, users can stream an uncompressed full HD signal directly out of the camera. This footage can be ported into an LCD display or appropriate external recording device or routed through a monitor and then to the recording device, eliminating the need for multiple connections.
Audio recording for professionals – The Nikon D4 features a stereo headphone jack for accurate monitoring of audio levels while recording. Output can be adjusted in up to 30 steps for precise audio adjustment. The D4 offers high-fidelity audio recording control with audio levels that can be set and monitored on the camera’s LCD screen. The microphone connected via the stereo mic jack can also be adjusted with up to 20 steps of sensitivity for accurate sound reproduction.
Multi-area Mode Full HD Video: FX/DX, and 2.7x crop mode at 1080p video modes – Whether shooting for depth of field in FX format mode, or looking for the extra 1.5X telephoto benefits of DX mode, the high resolution sensor of the D4 allows videographers to retain full 1080P HD resolution no matter what mode they choose. With the 2.7x crop, users can experience ultra-telephoto benefits in full HD resolution all at 16:9 aspect ratio.
Simultaneous live view output without display / simultaneous monitor – Shooters have the option to send the display signal directly to an attached monitor via the HDMI port. This signal can be viewed on the camera’s LCD screen and external monitor simultaneously. Additionally, the image data display can be cleared from the screen, to remove distracting data or when feeding a live signal.
Full-time AF – In addition to manual focus, four modes are available, including normal, wide area, face detection and subject tracking, which uses fast contrast detect AF to accurately focus while recording video and in live view.
New LCD screen – The large high resolution 3.2-inch LCD screen is 921K dots, and includes auto brightness adjustment. Users can also zoom in up to 46x to check critical HD focus.
Time lapse shooting – This new feature combines a selected frame rate and “shooting interval” in a dedicated time lapse photography menu. Playback can be achieved with a wide variety of speeds from 24x to 36,000x while producing a fully finished movie file output for faster multimedia workflows.
Remote shutter operation – Using dedicated Movie Custom Settings, recording can be set to be engaged by the shutter release button -users can now use a variety of remote accessories to trigger video recording.
NIKKOR lens compatibility – The highest caliber optics are vital to creating HD images and Nikon is the world leader in optics manufacturing with a legacy spanning more than 75 years. Nikon has a vast NIKKOR lens system, with more than 50 lenses with a variety of focal lengths and features, including VR II vibration reduction.
Professional Construction, Superior Operability
The reputation and respect bestowed upon a Nikon D-Series flagship camera is earned from those who use it; therefore the chassis of the Nikon D4 is machined from magnesium alloy for maximum durability and reliability. The body of the camera is sealed and gasketed for resistance to dirt and moisture, as well as electromagnetic interference. Photographers are able to easily compose through the bright optical viewfinder, which offers 100% frame coverage. The shutter has been tested to withstand 400,000 cycles for maximum durability, while sensor cleaning is employed by vibrating the OLPF. The self diagnostic shutter unit also encompasses a mirror balancer to minimize the residual “bounce” to enhance AF and extend viewing time. What’s more, the viewfinder is coated with a new thermal shield finish which works to resist overheating during prolonged use, enhancing overall reliability. Users can easily compose on the camera’s wide, bright and scratch resistant 921,000-dot high resolution 3.2-inch LCD screen.
The overall controls and operability of the camera has also been engineered with a renewed emphasis on speed and functionality. During critical moments, users will appreciate refined button layouts with renewed ergonomics, such as a quick AF mode selector placed near the lens mount for fast access on the fly. A new joystick style sub-selector is also placed on the camera’s rear for AF point and option selection, while vertical controls have been enhanced for improved operability. Finally, to continue the D4′s moniker of the best tool for just about any condition, key control buttons on the back of the camera can all be illuminated, making the camera simple to operate in complete darkness.
Nikon has also made enhancements to overall workflow, adding options to streamline the process and maximize shooting time. Users are now able to automatically generate IPTC data for their images and image sets, making organizing and chronicling images easier for both the photographers and their editors. A wired Ethernet port is also utilized so that a user can shoot tethered and transfer images easily and quickly to clients. Nikon has also introduced the new WT-5A wireless file transmitter, to transmit via FTP server or computer. The device can be set to transfer either automatically or manually selected images. This device also allows for remote operation of the camera using Nikon’s Camera Control Pro 2 software. A mobile application is also in development to control the camera using this accessory, which will include the ability to trigger the shutter and record video, making this a must-have remote accessory for many professionals.
Price and Availability
The Nikon D4 will be available in late February 2012 for the suggested retail price of $5999.95.
Selasa, 10 Januari 2012

Essential Video Tutorials For Shooting & Editing Video


Over the last several years I have shot about three dozen weddings using a Canon GL2 and various versions of Apple’s iMovie. When I first started out, I paid for a couple of video tutorials to help learn the craft, but nowadays you can learn all the basics by watching (and practicing!) free online video tutorials.
I’ve gone through many of the YouTube tutorials on how to make videos and picked out some of the most useful ones. Some of the best are from Videomaker magazine, a longtime resource for videographers, both professional and hobbyists.
how to make videosOne of the first things you need to learn about shooting video is how to hold a camcorder. After viewing these videos, you’ll see that it’s not as obvious as you may think.

1. These two videos, Basic Hand-Held Shooting Tips, and Pans and Tilts 101 cover techniques for hand-holding, zooming, panning, tilting with a hand-held camcorder.

2. The Seven Deadly Sins of Camerawork This is probably the first video you should watch because it presents common mistakes (e.g. excessive camera shaking, excessive zooming, and poor cutting) that make many videos uninteresting to watch.
3. The basics of video shooting is learning various types of shots for interesting productions. When you start learning shot types you’ll begin to recognize them in all the best Hollywood movies you see. Graspr, the Instructional Video Network, has some very good Video 101 tutorials in this area. I suggest watching Close-up and Wide Shots, Cutaway Shots and Camera Angle. In fact, the entire series should be viewed.
how to make videos
4. The best video productions are almost always effectively edited. Editing video is as much a skill as an art. Movie Maker and Adobe Premiere Elements are the introductory video editors for PC users. Tutorials for using these programs include Movie Maker Video Editing Tutorial and PalmBreezeCAFE’s three-part introduction to Adobe Premiere Elements.
how to make videos
For iMovie “˜09 users, the Apple site itself contains a very polished set of videos for organizing and editing your captured clips. Most YouTube videos on iMovie “˜09 primarily present an overview of the program, but a few skilled users have put together introductory tutorials: iMovie 09 Beyond the Basics and iMovie 09 – Advanced Features.
I personally think iMovie “˜09 is more difficult to use than the previous versions of iMovie. So if I still have iMovie “˜06′ HD installed on your Mac I would learn and continue to use it for longer video projects. A 20-part series on YouTube is a good introduction for iMovie HD.
5. If you’re thinking about going into the videography business, you’ll want to check out another Videomaker tutorial, How to Start a Wedding Video Business. This video covers a little about equipment, developing a contract, and how to cover a wedding. It really just scratches the service, but it’s a start. Wedding Videographer Style and The Best Videographer””IOV Award Winners are also a couple of five-minute introductions that will wet your appetite.
There are certainly more advanced and well done videos than the ones listed above. But I would recommend learning and practicing the basics of camcorder shooting and editing before you spend any money on expensive books and tutorials.
If you find this article useful, please let me know by leaving a few comments.

Rabu, 04 Januari 2012

Tips Trik Fotografi Foto Model & Fashion!


Memotret model (modeling photography), hampir sama teknik dasarnya dengan memotret obyek lainnya, hanya memiliki perbedaan khusus. Perbedaannya adalah pada obyek yang kita foto, yaitu ‘manusia’ baik itu lelaki ataupun wanita, kecil dewasa maupun tua. Banyak sekali unsur yang mempengaruhi hasil kita ketika memotret manusia. Nah, oleh karena itu, berikut beberapa hal yang perlu kita perhatikan saat memotret model atau manusia.
Kondisi si Model
Sebelum bicara banyak soal si model, ada beberapa factor utama yang menjadi penilaian utama dalam memotret manusia, antara lain: pose model, ekspresi, lokasi, komposisi, angle, costum, wardrop, makeup, background yang mendukung, dan lighting yang tepat!

Nah, sekarang, bicara soal kondisi si model. Foto model yang baik adalah foto yang memiliki mood yang baik. Kondisi ini bisa dipilah lagi menjadi, keadaan fisik si model
(seperti postur tubuh, tinggi rendah tubuh si model) dan kondisi mental (seperti mood si model, ekspresi wajah, keahlian pose si model). Hal tersebut akan sangat mempengaruhi baik buruknya foto yang akan kita hasilkan. Model yang baik adalah yang memiliki komitmen kuat akan pekerjaannya. Dalam kondisi apapun, ketika sedang dalam masa pemotretan dia akan mengatur mood-nya sendiri. Walaupun sedang ada masalah, dia akan tetap ceria dan menarik jika sampai di lokasi pemotretan. Model yang baik juga akan mudah sekali menyesuaikan pose dan ekspresinya dengan tema yang dibutuhkan oleh fotografer. Tetapi, terkadang, peran fotografer juga sangat penting di sini. Kita sebagai fotografer juga harus pintar dalam mengatur pose dan ekspresi model kita. Hal ini terkecuali untuk motret manusia untuk candid, journalistic atau street photography, fotografer akan sangat tergantung pada moment dan kondisi yang tepat pada saat itu. Moment yang tepat, timing yang pas, dan kondisi yang baik adalah anugerah terindah bagi fotografer.

Kostum & Make up
Poin berikutnya yang terpenting dalam modeling photography adalah terkait kostum atau
pakaian yang digunakan oleh si model. Carilah pakaian atau konstum yang tepat untuk model. Buat dia nyaman ketika memakai pakaian tersebut. Jangan sampai si model merasa bajunya terlalu ketat, terlalu kecil, atau terlalu besar dsb. Hal ini akan bisa mempengaruhi pose dan ekspresi si model. Begitu juga dengan make-up-nya. Tukang make-up yang baik pasti akan tahu seperti apa dia akan buat wajah si model yang sesuai dengan tema yang diinginkan fotografer. Berhatihatilah soal kostum dan make-up ini, karena akan sangat mempengaruhi hasil foto kita.

Lokasi
Mengapa lokasi? Karena akan dapat mendukung atau tidak dengan tema yang diinginkan oleh kita selaku fotografer. Carilah lokasi yang tepat dengan tema yang kita inginkan. Sebagai contoh, jika foto yang kita inginkan adalah foto fashion, maka carilah lokasi yang backgroundnya tidak terlalu ramai karena yang akan kita tonjolkan (POI) adalah pakaian yang digunakan oleh si model. Oh iya, lokasi ekstrim, yang sinar mataharinya terlalu panas, atau udaranya terlalu dingin, juga akan mempengaruhi kenyamanan si model. Sehingga, carilah waktu dan lokasi yang tepat!
Lighting
Mengapa lighting? Karena ada teori yang mengatakan bahwa, cahaya yang keras (hard lighting) lebih tepat untuk lelaki, sedangkan cahaya yang lembut (soft lighting) tepat untuk wanita. Foto fashion juga membutuhkan pencahayaan yang tepat agar dapat memunculkan detil baju atau pakaian yang akan kita promosikan. Ambillah keputusan yang tepat untuk soal cahaya ini.

Ketepatan olahan pasca pemotretan
Hal berikutnya yang perlu kita perhatikan adalah olahan (digital imaging) pasca pemotretan. Pada saat tertentu, sesuai kebutuhan konsumen, kita kadang perlu mengolah sedikit maupun banyak akan hasil kita. Perhatikan secara menyeluruh dan detil foto yang telah kita hasilkan. Perlukan tone warna perlu kita ubah? Banyak atau tidak jerawat si model? Jangan sampai si model dan konsumen kita merasa jadi jelek, kegendutan, banyak jerawat setelah melihat hasil jepretan kita. Selanjutnya untuk foto fashion, sudah cukup tepatkah warna/tone pakaian (fashion) yang dikenakan oleh si model? Berdasarkan pengalaman saya, berhati-hatilan soal ini. Jangan sampai warna baju atau pakaian yang seharusnya menjadi jualan konsumen kita berubah warnanya. Bisa marah-marah nanti konsumen kita!

Pengambilan angle dan komposisi
Hal ini soal teknis dan sangat penting. Tips yang paling mudah adalah, potretlah obyek kita sejajar dengan obyeknya. Jangan gunakan low angle atau dari atas. Dengan begitu, foto yang kita hasilkan akan sama dengan obyek yang kita foto. Memang, low angle tepat untuk model pria (man model) dan akan membuat si model yang kita foto menjadi lebih tinggi dan gagah. Namun, untuk foto fashion hal ini kurang tepat karena akan terjadi distorsi pada pakaian yang digunakan si model. Untuk foto model, kita harus jeli dengan detil si model. Terkadang, pada wajah atau badan model memiliki spesifikasi tertentu. Kadang, ada model yang di foto dari kiri kurang bagus, tapi jika di foto dari kanan akan lebih ganteng atau cantik. Perhatikan detil si model, mulai dari rambut sampai ujung kaki.
Sehingga, berhati-hatilah dengan angle dan komposisi ini. Pikirkan dengan baik tema yang akan kita inginkan!

Luweslah!
Satu hal lagi yang terpenting dalam motret model, yaitu komunikasi. Menjadi fotografer tidak hanya membutuhkan kemampuan teknis atau pengalaman. Namun, juga keluwesan dalam berkomunikasi. Syarat terakhir ini terutama dibutuhkan ketika memotret model. Maksud keluwesan adalah, fotografer harus mampu berkomunikasi dengan baik sehingga
tercipta atmosfer yang nyaman. Kalau ini terjadi, fotografer akan lebih mudah mengarahkan modelnya. Ekspresi yang diinginkan juga akan bisa keluar dengan baik. Jadi, jangan kaku! Kalau kita kaku, kita juga akan sulit mengarahkan modelnya!
Oke, demikian tips sedikit dari saya! Semoga bermanfaat dan sukses selalu untuk Anda!
Salam jepret!

oleh Mishbahul Munir, Poetrafoto Photography Studio Yogyakarta Indonesia


capturing your memories Copyright © 2011 -- Template created by O Pregador -- Powered by Blogger