Senin, 31 Oktober 2011

Canon EOS 500D (Digital Rebel T1i / Kiss X3 Digital) Review


Review based on a production Canon EOS 500D
Just 14 months after the launch of the EOS Rebel XSi (450D), Canon has unveiled its latest model, the Rebel T1i (500D). It's the fifth generation of Rebel and enters the market at a difficult time - in the midst of a global economic downturn and against the fiercest competition we've ever seen in the entry-level DSLR sector. So what has Canon done to make this latest model in the longest-established family in the sector live up to the edgy and exciting image implied by its US naming?
The 500D/T1i doesn't quite have to be the everyman camera that its predecessors were. The introduction of the Rebel XS (1000D) in June 2008 means the T1i no longer has to appeal to everybody who doesn't want to stretch to buying into the 50D class. As a result, the 450D was able to bulk up its feature set to include a selection of features that price-conscious shoppers don't necessarily realize they want, such as a larger viewfinder and spot metering. The result was probably the most complete Rebel we'd seen.
There's a full explanation of the differences between the 500D/T1i and it predecessor on the coming pages but, in general terms, it's a gentle re-working of the 450D. So you get the 15MP sensor much like the one that appears in the 50D, helping this to become the first entry-level DSLR to feature video (and 1080p HD video at that). You also get the lovely 920,000 dot VGA monitor that has been slowly working its way down most manufacturer's DSLR line-ups. There are a handful of other specification tweaks that come from the use of the latest Digic 4 processor but essentially this is most of a 50D stuffed into the familiar 450D body.
And, if the loss of the letter 'X' from the US name seems a bit disconcerting, you can comfort yourself with the knowledge that the Japanese market will still know it by the odd-to-European-ears 'Kiss X3 Digital.' For simplicity's sake, we'll refer to the 500D/T1i/Kiss X3 by the name 500D throughout the rest of the review.

A brief history; Canon entry level digital SLR series

* The Canon EOS 1000D represents a sub-class of the Rebel series and hence should be considered a parallel series

Compared to predecessor - key differences

Although for the time being the EOS 500D will sit alongside the 450D in the Canon DSLR line-up there is no doubt that sooner or later it will replace the older model and occupy the spot between the 1000D as and the EOS 50D on its own. The most noticeable new features on the EOS 500D are the higher resolution sensor, the new high-res LCD and the HD video mode but the camera also comes with the latest generation DIGIC imaging processor which brings a few more low-key improvements such as fine-tunable noise reduction and Highlight Tone Priority or a fresher, animated menu design with it. See the list and table below for all the spec and feature changes..
  • Higher resolution sensor (15.1 vs 12.2 effective megapixels)
  • Extended ISO range up to ISO 12800
  • HD video capability
  • New 3.0 inch 920K pixels screen
  • Adjustable noise reduction and highlight tone priority
  • Face Detection in Live View
  • Peripheral Illumination Correction
  • HDMI output
  • Larger buffer in continuous shooting
  • Digic 4 style menu design

Canon EOS 500D vs. EOS 450D feature and specification differences

 
Canon EOS 40D
Canon EOS 500D
Canon EOS 40D
Canon EOS 450D
Sensor • 15.1 million effective pixels • 12.2 million effective pixels
Image sizes • 4752 x 3168
• 3456 x 2304
• 2353 x 1568
• 4272 x 2848
• 3088 x 2056
• 2256 x 1504
Image processor DIGIC 4 DIGIC III
Sensitivity ISO 100 to 3200, extendable to(6400) and H (12800). ISO 100 to 1600
Auto ISO ISO 100 to 1600 ISO 100 to 800
Noise reduction Four levels On/Off
Auto lighting optimizer Four levels On/Off
Viewfinder info Now includes Highlight Tone Priority icon  
LCD monitor • 3.0 " TFT LCD
• 920,000 dots
• 3.0 " TFT LCD
• 230,000 dots
Video mode • 1080p @ 20fps
• 720p @ 30fps
• VGA @ 30fps
• MOV (Video: H.264, Sound: Linear PCM)
No video capability
Live view AF • Quick mode (Phase detect)
• Live view mode (Contrast detect)
• Face detect (Contrast detect)
• Quick mode (Phase detect)
• Live view mode (Contrast detect)
Peripheral illumination
correction
• Profiles of 25 lenses includes  
High-speed continuous • 3.4 fps
• 170 JPEG/Fine frames
• 9 RAW frames
3.5 fps
53 JPEG/Fine frames
6 RAW frames
Menu UI Digic 4 interface Digic III interface
Connectors • USB 2.0 Hi-Speed
• Video output (PAL/ NTSC) (integrated with USB terminal)
• HDMI Type C
• USB 2.0 Hi-Speed
• Video output (PAL/ NTSC) (integrated with USB terminal)
Menu languages 25 20

Foreword / notes

If you're new to digital photography you may wish to read some of our Digital Photography Glossary before diving into this article (it may help you understand some of the terms used).
Conclusion / recommendation / ratings are based on the opinion of the author, we recommend that you read the entire review before making any decision. Images which can be viewed at a larger size have a small magnifying glass icon in the bottom right corner of them, click to display a larger image in a new window.
To navigate this article simply use the next / previous page buttons or jump to a specific page by using the drop-down list in the navigation bar at the top of the page. You can support this site by ordering through the affiliate links shown at the bottom of each page (where available).
This article is protected by Copyright and may not be reproduced in part or as a whole in any electronic or printed medium without prior permission from the author.
Dpreview use calibrated monitors at the PC normal gamma 2.2, this means that on our monitors we can make out the difference between all of the grayscale blocks below. We recommend to make the most of this review you should be able to see the difference (at least) between X,Y and Z and ideally also A, B and C.

Sabtu, 29 Oktober 2011

Shooting with an In Camera Flash

In-Camera-Flash
Has anyone noticed how there has been a real anti-flash vibe going around recently in the digital photography sphere? I’m seeing it in books, websites, forums and even from manufacturers of cameras themselves with the recent release of loads of cameras that would rather push ISO up very high than use a flash.
While I would totally agree that flash photography can blow out a shot with it’s harsh light – there are times where there’s no getting around using it and where (when used correctly) it can actually ‘make’ a shot.
My preference with flash photography is to have dedicated flash that is either on a hotshoe, flash bracket or off camera – however there are plenty of times when all you’ve got at your disposal is the in camera flash. 99% of all cameras have them – so perhaps it’s time we thought about how to get the best results from them.
Here are a few tips:


1. Get In Close

Flash
The main limitation of built in flash units is their power. Whereas external flash units have their own dedicated power source and can be quite large – a built in flash shares it’s power with your camera’s other components and it’s generally quite a bit smaller.
Knowing this should drive you to get in close enough to your subject for the flash to have some impact (usually within 2-3 meters). If you can’t get in close (for example if you’re at a rock concert and are sitting in the back row) you’ll probably achieve better results by turning your flash off and bumping up the ISO setting.

2. Try Slow Sync Flash

Another limitation with in built flash units is that they can produce quite harsh results that mean any other ambient light in a scene is lost. This is partly because the light they produce is unable to be directed/bounced indirectly onto your subject.
One way around this is to use Slow Sync Flash. You can read about this technique in our tutorial on the topic – but in short it involves choosing a slower shutter speed and firing the flash while the shutter is open.

3. Diffuse or Direct Your Flash DIY style

Flash-Diffuse
I’ve already alluded to the problem of not being able to diffuse the light produced by a fixed flash unit – however one technique that some inventive photographers use is to take a Do It Yourself approach and create their own diffusers.
Some photographers I know always have a roll of semi-opaque adhesive tape in their camera bag to put over their flash. This doesn’t stop the flash’s light but diffuses it.
Other friends take a little piece of white card with them which they put in front of their flash to bounce it up or sideways.
Using these techniques might mean you need to play with exposure compensation (you’ll probably want to increase exposure by a stop or two) as your camera won’t be aware that you’re taking some of the power out of it’s light.

4. Fill-in Flash

Don’t just use your flash when it’s dark. Often when shooting outdoors a flash can really lift an image up a notch – particularly when photographing a subject with strong backlighting or one with harsh downward light. A fill in flash lights up shadowy areas. Read more about Fill Flash.

Understanding lenses and their specifications


The joy of owning a DSLR is the ability to change lenses. You could go for a wide angle to squeeze more in, or a telephoto to magnify a distant subject. Or how about a macro lens for taking great quality close-ups? There’s almost no limit to what you can do, with lenses to suit all occasions – and budgets – but so where do you start? In this guide we’ll explain everything you need to know about buying lenses and help you make the right choice for your style of photography.


When choosing a new lens for your DSLR, you should think about what kind of photos you’re trying to take how and you’re finding your current model unsatisfactory. Maybe you’re struggling to fit everything in. Perhaps you can’t get close enough to sports players or wildlife. Or you might be perfectly happy with the range of your current lens, but you fancy something which delivers better quality, focuses quicker, has anti-shake facilities or maybe works better in low light.
There’s almost always more than one lens which does what you’re after, so the next step is working your way through the options which are available. If this is your first DSLR, the names given to lenses can often feature a bewildering array of letters and numbers, but it’s actually easier to decipher than it first appears. Here are the key specifications to look out for.

Focal length


The most important lens specification is the focal length. This defines the coverage of the lens, and how much you’ll fit into the photo. Focal length is measured in mm, and the number which closest matches the magnification of the human eye is 50mm. Our eyes have a much bigger field of view, but if you were to look at something in person, and then through a 50mm lens, the actual magnification would be similar. This is why 50mm lenses are known as standard lenses – they’re suited to a wide variety of subjects from landscapes to portraits.
Lenses with focal lengths smaller than 50mm are known as wide angle because they fit more into your photo. If you’re stood in the same position, a 25mm lens will have twice the diagonal field of view of a 50mm, and could therefore be used to squeeze in large buildings, landscapes or even big group shots – ideal when you can’t step back any further. 28mm is the most common wide angle focal length and is ideal for landscape and architecture shots, but you can go much wider still if desired, and anything below 20mm is typically known as an ultra-wide angle lens.

Squeezing in such a big view means wide angle lenses inevitably suffer from some distortion, especially towards the edges, but this can be used to exaggerate subjects for a special effect; indeed a special type of ultra-wide angle lens called a fish-eye deliberately uses distortion to deliver a highly curved result. Lenses with shorter focal lengths also inherently have a larger depth-of-field, which means it’s easier to get lots in focus from near to far. The examples here were taken with a 17mm focal length.


Lenses with focal lengths bigger than 50mm are commonly known as telephoto models. These fit less in, and are therefore ideal for getting closer to distant subjects or picking out detail; they also give a more flattering effect when taking photos of people. In contrast to wide angle, lenses with longer focal lengths have an inherently smaller depth of field, which means it’s easier to get a blurred background effect – again ideal for portrait, wildlife and sports photography.
Good focal lengths for portraits are typically between 85mm and 135mm – these are often known as short telephotos. Appropriate focal lengths for sports or wildlife are generally much longer – at least 200mm, and ideally 300mm or more. Professional sports and wildlife photographers often use 600mm lenses, or even longer still. The two examples here were taken at 400mm.
You can buy lenses with either a fixed focal length which doesn’t vary, or a zoom lens which goes from one focal length to another. Zooms are very convenient, but generally aren’t as good quality as a fixed lens. Fixed focal length or 'prime' lenses are also normally smaller, lighter and give a brighter view that’s better for low light – see aperture section on the next page. It’s all about weighing up convenience against quality, although some more expensive zooms can be very good.
General purpose zooms usually go from wide angle to short telephoto, such as 28-80mm, although some ‘super-zooms’ could give a range from 28-300mm, covering almost every photo opportunity. There are also wide angle zooms which normally offer an ultra-wide to normal range, such as 16-35mm. Similarly there are telephoto zooms which go from short to long telephoto focal lengths, such as 70-300mm.

Next we'll look at what you'll get in practice at different focal lengths and find out about lens brightness in our coverage and aperture section.

20 DSLR photography tips »

This article lists 20 tips to get started with DSLR photography. It is particularly useful to those who are used to point-and-shoot digicams and now want to take the next step in their photography skills.
I first got in touch with a DSLR camera during our holiday in Costa Rica. You can check some of those pics here and here. Although we got a lot of postive feedback about those pictures, there's a problem with them. We used the DSLR cam as if it were a point-and-shoot snapshot cam in automatic mode, not knowing about the power of the various manual controls. The fact that some of our pics turned out nicely, says more about the camera than it says about our skills. Furthermore, the selection we published is a very small subset of the 1,200 pics that we took in total, of which many are of a sub optimal quality.
By experimenting a bit and reading a few books, I now know more about DSLR photography, and we hope to put this in practice during our next trip. Most people know from experience that when it comes to services that could be anything from those provided by o2.co.uk to computer lessons or software or bits of equipment, that having some tips from a fellow user can come in handy. The DSLR is not hugely complicated to use but it does take some time to get used to. Hopefully with the following information you should be able to cut a few corners while you learn. I'm still a beginner though, so here's a beginner passing on beginner tips to those who are just beginning with DSLR photography :)
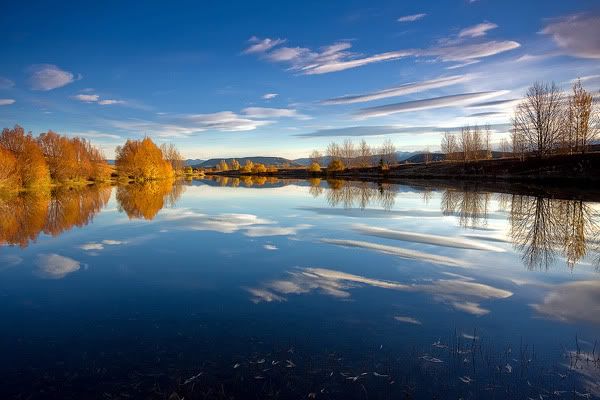
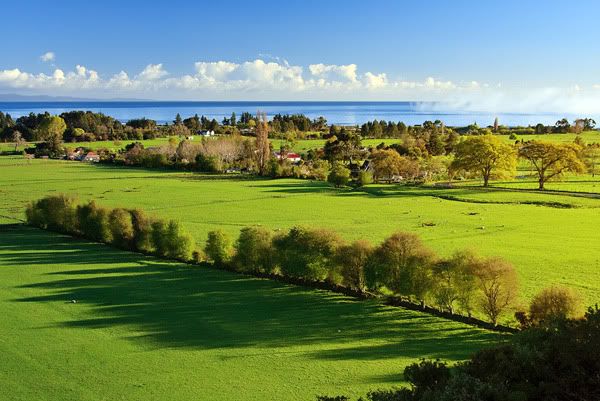
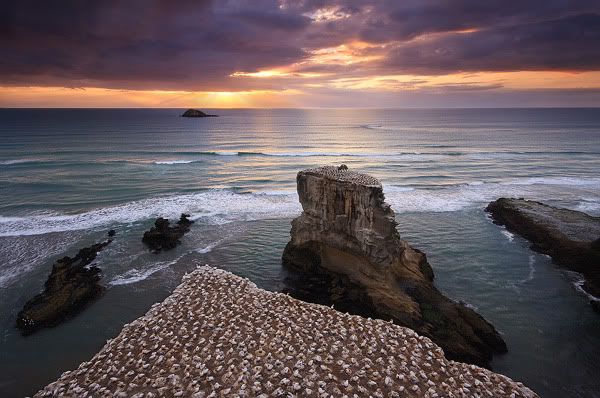
1. Landscape composition
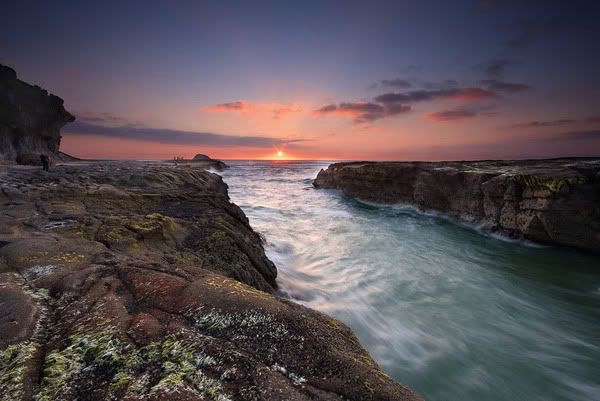
If you're shooting landscapes, there is a very easy rule to follow: the rule of the thirds. The idea is simple: 1/3 or 2/3 of your image should make up either the sky or the foreground, depending on where you want to put the focus on. This gives the photo more depth and a more dramatic look. It's a simple tip but beginners often position the horizon at exactly 1/2 of the photo.
Below is a photograph with the horizon at roughly 1/2 of the photo. Quite dull, and without any depth:


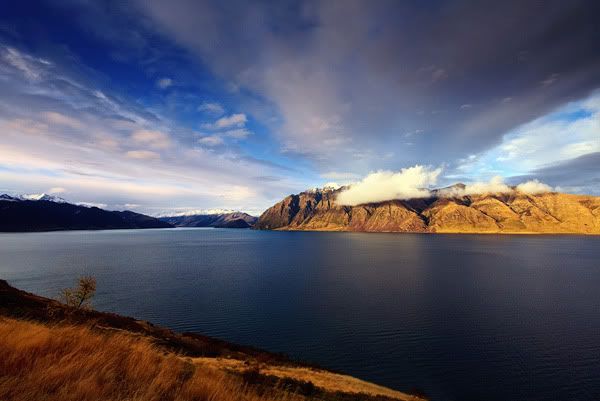
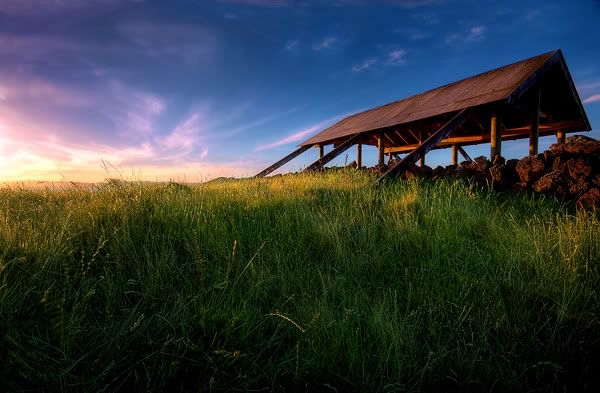
The next one focuses on the foreground, with the foreground at 2/3 and the sky at 1/3. Notice how this increases the depth:

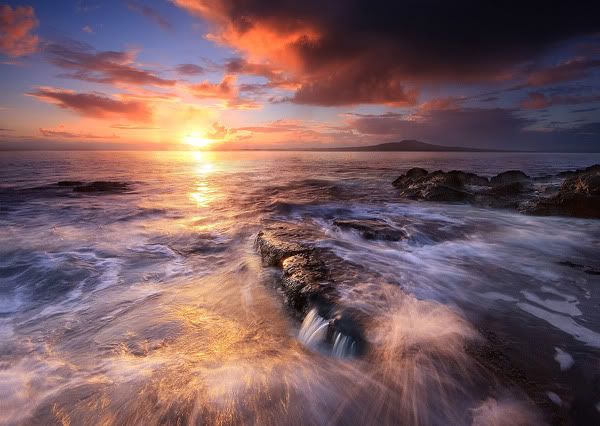
And this one focuses on the sky (2/3), and leaves 1/3 for the foreground:

2. How to use aperture
somewhere on your cam, there is a manual setting that shows the options P, A, S, and M. A stands for aperture. Personally, I find this the most useful manual override on any cam. Aperture indicates how much of the stuff you see in your viewfinder will be in focus. A low aperture means that only the foreground will be in focus, whilst the background will be fuzzy. This is typically used for close-ups and macro-photography, or when you simply want to highlight a subject in the photo. A high aperture means that everything will be in focus, this is typically used for landscapes.
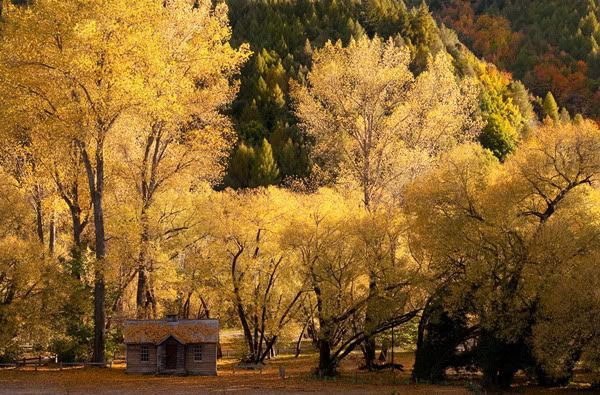
This example shows a subject shot with a low aperture, putting the foreground in focus whilst the background is fuzzy:

This example uses a high aperture, meaning that the full scene is in focus:

The range of aperture settings differ per lens, so be sure to play around with this.
3. How to shoot ultra-sharp images
The key to shooting ultra-sharp images is to of course keep your camera steady. Most cameras now have automatic stabilizers, giving you some tolerance in your movement. However, I noticed that even with the automatic stabilizers, upon close inspection on a large LCD screen, most of our pics had subtle blur effects in them. The only way to truly avoid this is to use a tripod. Inconvenient, but indispensable if you have the believe the experts. I have no experience with a tripod, but I will definitely bring one along on our next trip. An alternative is to use the self-timer of the cam, but you will not always have a steady surface to place the cam on.
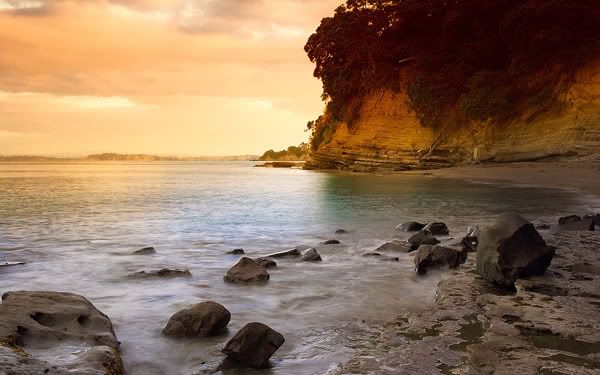
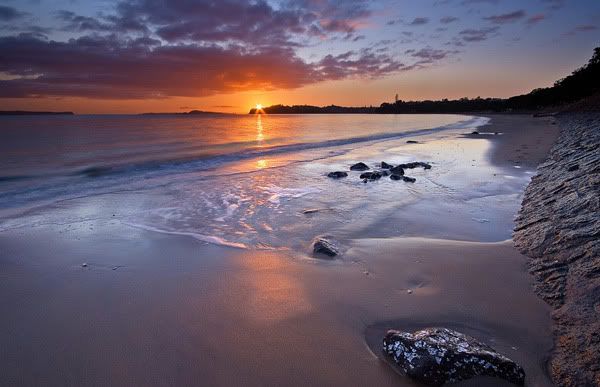
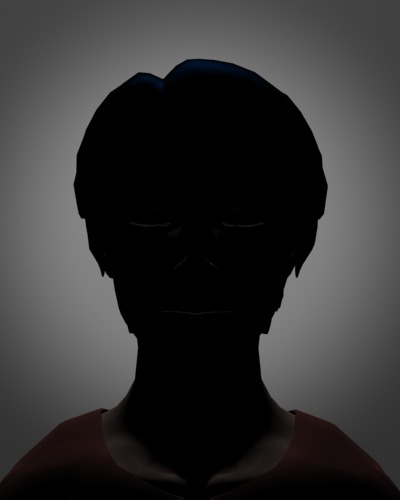
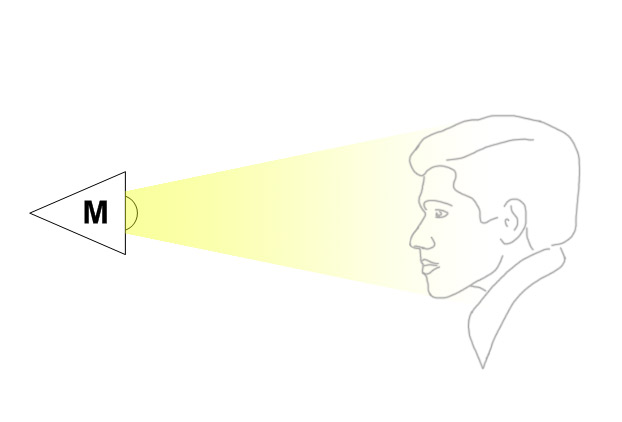
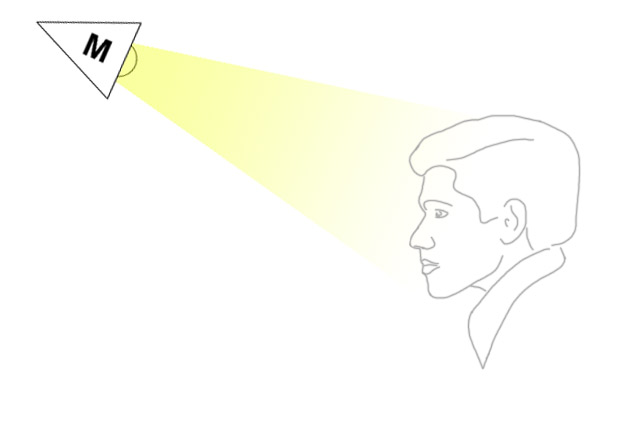
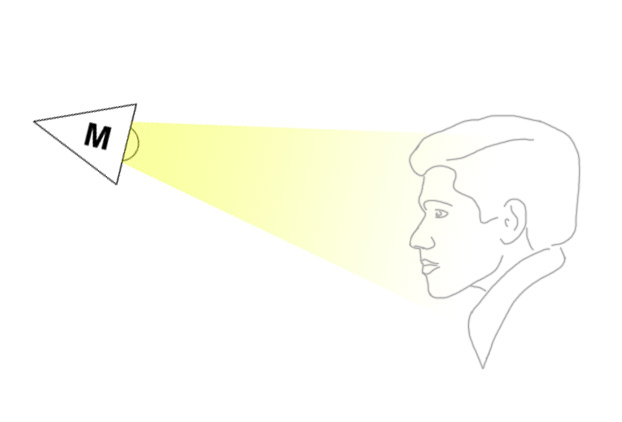
4. Shoot in soft light
This one was kind of counter intuitive when I first heard it. I thought the best time to go shooting was in full daylight, but nothing could be further from the truth. Direct sunlight is in fact a photographer's nightmare. It causes overexposure, harsh shadows and a loss of detail. 
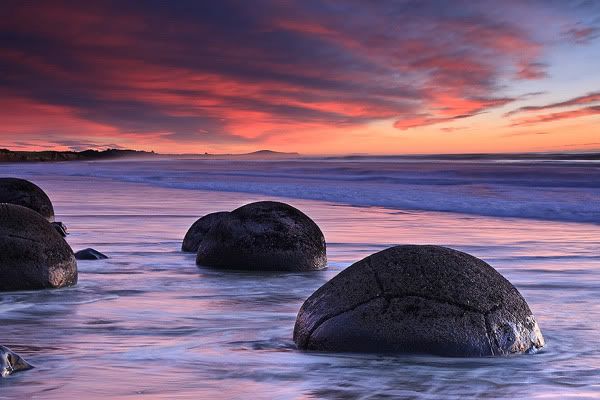
The best time to go shooting is at diffuse light, i.e. at dusk, dawn or right before/after a shower. If you have to shoot during the day, always shoot from the side, never let the sunlight be in front of you or behind you.
5.  How to use ISO
ISO is a setting on your cam that determines the film speed. For beginners like us it basically means that the higher you set your ISO, the more light comes in. So, in dark settings, you can increase the ISO to capture more light. This comes with a major downfall though: it dramatically increases the noise on your pictures, and noise is hard to remove during post processing. Ideally, you should keep ISO as low as possible, only slightly increase it when shooting in dark scenes.
6. How to use white balance
Most cameras allow you to set the white balance. The white balance setting tells the cam which intensity/colors to see as highlights. This is one of the settings that you will want to override often. For example, when I'm shooting indoors in artifical light, I set the white balance setting to the "artifical light" mode. The result is that you get pics that look as if they were shot in daylight, without the need to use a flash. Note that if you shoot your pics as RAW, you do not need to worry about white balance, as this can be set during post processing. This is not the case for JPEG images, unfortunately.
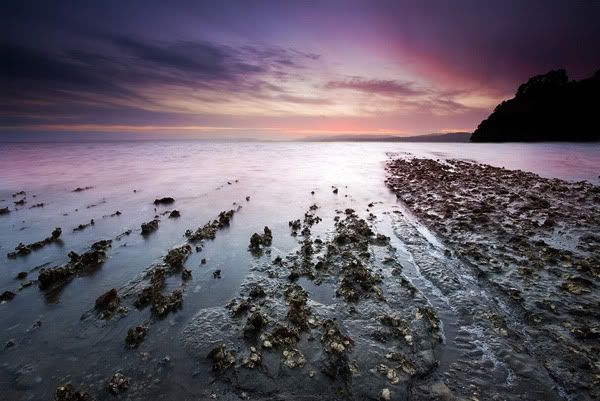
7. What is Shutter speed?

Out of the P, A, S, M settings, S stands for shutter speed. A low shutter speed is useful to get sharp pictures from moving objects. You can also intentially set the shutter speed to a high value in order to create a more experimental picture, i.e. to capture fireworks, or the trail light of a car. I have little experience with shutter speed, so I will just tell you what it is for. Note though that shutter speed automatically increases in dark scenes, you will really need a tripod or self-timer for pictures to be sharp then.
8. When to use Automatic mode
Out of the P, A, S, M settings, P stands for program mode. You can consider this the fully-automatic setting of your cam, where it intelligently sets the aperture and shutter speed for you based on what you shoot. The best use for P is when you are not sure what you will shoot. Examples can be wildlife, or an urban scene where the scene itself changes so fast that you do not have time to manually tune your camera for the shot. Be sure to shoot a lot, so you increase your chances of having a sharp shot.
9.  Keep things simple
Don't try to capture it all at once. Often it is better to keep your subject simple. Particularly complex backgrounds can really ruin a picture. Another poor example is to shoot crowds, they are simply not interesting, too complex and don't bring a clear message.
This is an example of a meaningless picture:

Now compare this to  the focus and simplicity of this picture:

10. Allow your subject to move
Particularly with a zoom lens it is tempting to comes as close as you can, and to barely let the subject fit the frame. This is not the right thing to do though, as the subject becomes too static and the viewer cannot determine the context. This is best explained by an example.
Notice how the snake barely fits the frame. It seems locked in, and we do not have sense of its context or where it might be going:

Now notice that in the next example, the bird has room to go where he is pointing towards:


11. Never trust your LCD!
This is one of the most important tips that I have. I learned this the hard way. With a modern cam, you can instantly check the quality of your shot. The problem is, everything always looks sharp on a 2 inch screen. It is not until you come home and project your pics on a large screen that you will notice the blur, unsharpness and composition errors. Do not trust your cam's LCD.  If your cam allows it, zoom in to the maximum to check every portion of your shot for errors, while you still can. Also, take a lot of shots in order to increase your chance of success.
12.  Move around and experiment
A lot of photographers walk up to a scene and just start shooting. Often you will not get the best shots this way. It is recommended to move around the subject and see it from different angles. Also, try out various settings on your cam to experiment. Film is cheap. This tip is kind of a no-brainer, but many do not put it into practice. A slightly different angle can make a world of difference in exposure. I personally experimented a lot in our garden. Nobody bothers me there and I can try out lots of things at my own pace. You'll be surprised how much you can learn and how interesting your shots can be in even the dullest of gardens. And of course, you really do not want be to be learning your cam on the scene, you should be ready on the scene.

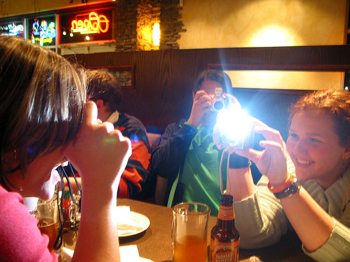
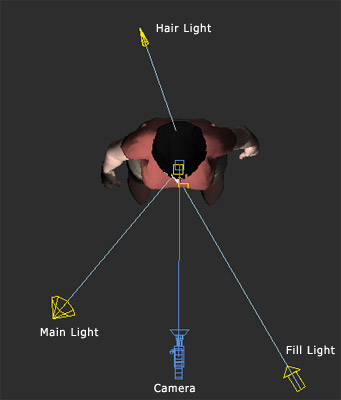
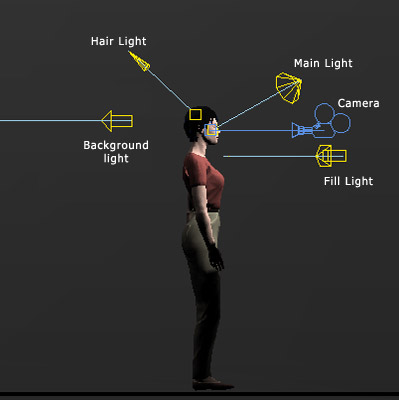
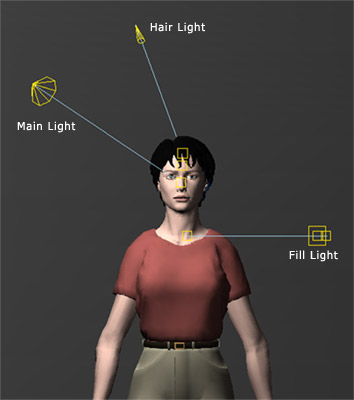
13.  Avoid built-in flashes
I never knew this either, but using your cam's built-in flash is rarely a good thing. The problem with this flash is that it will point directly at your subject and cause hard light with harsh shadows. Diffuse light is much better. This is why most pro cams do not even have an integrated flash, instead they rely on an external flash which they point to the ceiling or wall to create diffuse light with soft tones. Also note that you can often avoid flash by tuning your ISO and white balance settings.
14.  Choose one brand, and stick to it.
If you're into digital photography for the long run, it is best to choose a single brand and stick with it. the biggest investments you will make are in lens equipment and you will want to make sure that your lenses fit when you replace the cam body. There's plenty of good brands around, but if you ever want to evolve into a (semi) pro, it seems there is little choice: Canon or Nikon.
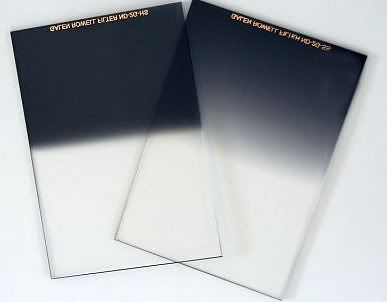
15. Consider purchasing filters
Filters are lens extensions that you can screw onto your lens. A common one to have is a U/V filter. It protects your lens from direct sunlight. Although many disagree with this, there's one other benefit. The filter will protect your lens if you drop it. The filter may be gone, but your expensive lens is likely to survive. Other filters you can consider are the polarizing filter (to decrease reflections), colorizing filters (increase richness of color) and the IR filter (to shoot in complete darkness). I'm not much of a filter fan personally, as most filtering effects can be done during post-processing.
16. Learn more by watching others
A very cheap and effective way to learn about photography is to browse through photo sites that display metadata. You just select a picture you like, and then you wonder...how did he do that? By reading the meta-data, you can see which settings for aperture, shutter speed, ISO, etc the photographer used. Next, you can apply the same settings to a similar subject.
If you're into reading books, I highly recommend to use multiple books on the subject. I have read a few and some advise was conflicting with another author.
17.  Consider using Adobe Lightroom
Many of you will use Adobe Photoshop for post-processing, which is an excellent choice. Do know though, that there is a dedicated, professional-level photo processing application from Adobe as well. It's called Adobe Lightroom, and comes far cheaper than Photoshop. Although targetted at professionals, even a noob like me can use it. In essence, the "Develop" panel will show you a ton of sliders that you can use to tune your pictures.
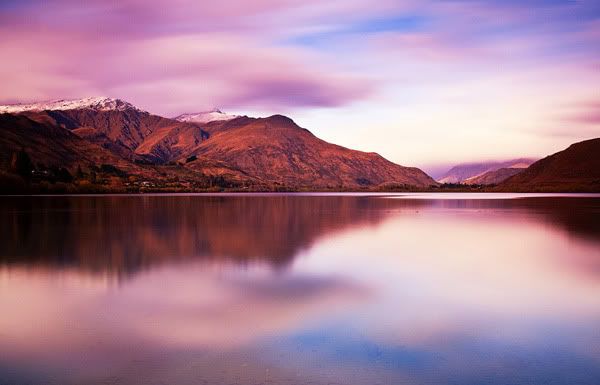
Here is an unprocessed photo:

1 minute later, after playing around with a few sliders in Lightroom:

This example is slightly over-processed if you ask me, but it's only an example to show how much impact post-processing can have. 
18. Backups and memory cards
It is better to buy a few fast, small memory cards, than a single large one. This way you will decrease the chance of losing everything when the card fails. Also, the sooner you get to backup the card to a hard disk, the better. Always store your pictures on multiple disks, preferably at different locations. Photographs you have taken cannot be replaced once lost.
19. Keep track of what you shoot
During our Costa Rica trip, we did not keep enough track of what we were shooting. Back home, we had a lot of trouble organizing the photos by location, animal, etc. Therefore, at the very minimum write down where you were at what date. This way you can match the date of the photos with the location later on. Even better is to keep a note book to write down extra details. Some cams may also give you the option to attach a voice recording to a photograph.
20.  Metering mode and focus mode
This last tip is kind of targetted towards both myself and you. I have learned that you can set most cams into different metering and focus modes. I somewhat know what this means, but have not experimented with it enough to tell you when to use which mode. For now, just know that it's there and that it may require some follow-up.
Concluding
Those were my tips. Again, do not trust me as an expert on this, be sure to read some books from professional photographers. I still hope that you found my tips to be somewhat useful in figuring out the basics of DSLR photography. 

Jumat, 21 Oktober 2011

Pedoman Cara Shooting Video Berkualitas

Pernahkah Anda mengalami hal ini? Anda membeli camcorder digital baru (penuh dengan fitur-fitur terbaru) dan dengan senang hati men-shoot acara keluarga yang luar biasa (pernikahan, liburan, ulang tahun dan acara penting lainnya).
Baru kemudian Anda menyadari bahwa rekaman video terlalu gelap, atau kualitas video sangat mengerikan. Bukankah itu firasat buruk? Apa yang membuat lebih buruk adalah bahwa Anda tidak pernah dapat kembali merekam video itu!

Cara terbaik untuk menghindari masalah ini adalah dengan mempelajari beberapa keterampilan dasar shooting video. Anda tidak perlu belajar sinematografi kompleks atau keterampilan sutradara. Tapi Anda harus memiliki pengetahuan dasar tentang cara apa yang dilakukan dalam men-shoot video yang bagus dan tidak.
Mari kita lihat tips-tips SHOOTING VIDEO berikut ini:
1. Hindari Zooming In dan Out Terlalu Banyak
Digital camcorder saat ini banyak diproduksi dengan fitur super duper 1000x zoom in dan zoom out. Ini adalah hal yang baik, tapi masalahnya adalah, banyak orang terbawa untuk menggunakan fitur ini tanpa mengetahui apa titik lemahnya fitur ini. Saya telah melihat banyak produksi video yang tak terhitung jumlahnya yang terus menggunakan zoom in dan zoom out selama men-shoot di lapangan. Mereka biasanya berhasil memberi saya tontonan yang menyebabkan saya sakit kepala.
Gunakan fitur memperbesar dan memperkecil ini seminimal mungkin. Bahkan jika Anda harus menggunakannya, lakukanlah secara perlahan-lahan.
Menggunakan fitur ini dengan lambat jauh lebih profesional dibandingkan Anda menggunakan zoom dengan cepat.
TIPS: Batasi penggunaan fitur ini apabila men-shoot antar adegan, dan gunakan tripod kamera apabila anda membutuhkan zoom dengan jarak yang agak jauh! Penggunaan normal zoom dgn stabil maks. 4X apabila Anda tidak menggunakan Tripod!
2. Steady. Apakah Ini?
Para profesional selalu mengatakan “Keep It Steady”. Ketika kita sedang men-shoot, tangan kita cenderung untuk bergetar sedikit. Jika getaran terlalu banyak akan mempengaruhi kualitas rekaman video.
Ada dua cara untuk mengatasi hal ini. Salah satunya adalah dengan melakukannya seperti para profesional – mendapatkan dudukan tripod yang baik. Ini dapat dilakukan dengan mudah. Cara lain adalah Menahan diri terhadap sesuatu seperti dinding atau mungkin berlutut dan mencari tumpuan kamera seolah-olah tangan Anda menjadi Tripod (tangan bertumpu di atas meja), dll.
3. Dimanakah Anda?
Salah satu tip yang saya gunakan saat men-shoot sebuah liburan keluarga adalah selalu mencari petunjuk, tanda atau monumen alam yang memberitahu para penonton di manakah Anda berada. Apakah Anda melihat para profesional melakukan ini juga? Sebagai contoh, di film, Pertama kali Anda mungkin akan melihat kamera zoom in pada sebuah tempat (gedung) sebelum masuk ke adegan yang terjadi di dalamnya.
Tips lain adalah membuat orang yang shoot bicara atau tersenyum. Hal ini membuat seluruh video jauh lebih hidup dan menarik.
4. Akhir atau Awal?
Trik lain video shooting yang baik adalah dengan menggunakan akhir cerita di awal video. Sekali lagi, para ahli melakukan hal ini sepanjang waktu. Jika Anda merekam video pernikahan, Anda bisa mulai dengan wawancara dari pasangan bahagia ini pada hari pernikahan sebelum Anda masuk ke adegan tentang bagaimana mereka tumbuh, bagaimana mereka bertemu, hingga bagaimana cara pengantin pria melamar pengantin wanita, dll.
5. Short & Simple (pendek dan sederhana)
Jangan pernah men-shoot klip video lebih dari dua menit. Ini membosankan penonton sampai JAMURAN! Menggunakan banyak klip pendek durasi 5 sampai 10 detik jauh lebih efektif. Hal ini juga membawa beraneka ragam tayangan kepada penonton. Bayangkan jika sebuah iklan televisi berlangsung dua menit berfokus pada adegan video yang sama – SUNGGUH MEMBOSANKAN BUKAN?
6. Lighting, Lighting, Lighting
Dari semua faktor yang ada di atas, hal yang merusak video adalah pencahayaan yang buruk. Saya telah melihat beberapa video yang inovatif dirusak oleh pencahayaan yang buruk. Salah satu tip penting untuk merekam video adalah dengan sumber cahaya di belakang Anda, bersinar (mengarah) pada objek. Contohnya adalah sebuah shoot di luar ruangan (outdoor) dimana matahari bersinar. Pastikan matahari bersinar pada subjek Anda dan bukan pada lensa kamera Anda!
Tip lain adalah dengan menggunakan fitur backlight pada kamera jika ada satu. Hal ini memungkinkan Anda untuk mengkompensasi cahaya terlalu terang dari belakang objek.
7. Ubah Perspektif Anda
Jangan membatasi bidikan Anda ke salah satu sudut saja. Pendekatan subjek dari semua sudut. Datang dari belakang, datang dari atas, apa pun. Mungkin Anda bahkan dapat membuat cara sendiri dengan berjalan menaiki tangga dan membuka pintu kamar tidur sebelum mencapai objek Anda.
8. Belajar dari The Movies (Film)
Anda akan terkejut berapa banyak Anda dapat mempelajari video shooting dari film. Sangat sering, kita hanya duduk dan membiarkan adegan film yang kita lihat tanpa mengetahui apa yang menjadi pikiran sutradara. Cobalah – untuk sekali, ketika anda menonton film, pertimbangkan bagaimana sutradara membingkai film yang di-shoot (adegan). Anda akan belajar banyak dan bahkan mungkin tertarik dalam mengarahkan film!
9. Menghemat Baterai
Saya telah melihat atau mendengar begitu banyak orang melupakan tentang baterai. Yang saya tekankan di sini. Silahkan membeli baterai ekstra! Sebaiknya dua ekstra baterai. Tidak ada yang lebih buruk daripada shoot video di luar ruangan dan baterai Anda mati. Juga, selalu membawa adaptor AC juga – sehingga Anda dapat mengisi baterai saat Anda kapanpun bila waktu mengizinkan.
10. Check Sound
Tip ini mungkin tidak penting bagi pengguna rumah tangga. Tapi jika Anda seorang videografer yang profesional, Anda harus memiliki mikrofon yang terpasang pada camcorder anda. Mikrofon adalah alat penting untuk agar suara menghasilkan kualitas audio yang lebih baik.
Kesimpulan
Tidak memperoleh keterampilan men-shoot video dengan baik. Setelah Anda mempelajari dasar-dasar, saya jamin itu akan datang kepada Anda dengan sangat alami, hampir seperti naik sepeda atau berenang. Jika Anda benar-benar tertarik dalam meningkatkan keterampilan men-shoot, saya akan merekomendasikan anda untuk mengikuti kursus teknik videography lebih lanjut.

Kamis, 20 Oktober 2011

Tips Merekam Video dengan Kamera Foto DSLR Full HD

Anda tahu kamera DSLR? Itu loh, kamera "fotografer" :D
Di tempat saya istilah kamera "fotografer" selalu mengacu pada kamera DSLR, padahal tidak semua fotografer menggunakan kamera DLSR untuk memotret.. :D
Nah, beberapa tahun terakhir ini muncul model kamera DSLR yang mampu merekam video, FULL HD lagi. Jadi kali ini saya akan memberikan tips-tips untuk merekam video dengan DSLR.

Mungkin 2 tahun lalu masih janggal ya melihat orang menenteng DSLR tapi malah merekam video namun sekarang sepertinya itu sudah pemandangan biasa. Bahkan rumah-rumah produksi pun sudah menggunakan kamera DSLR untuk membuat video klip.

Berikut tips-tips yang perlu anda ketahui seputar merekam video dengan kamera DSLR:
1. Sediakan media penyimpanan tambahan
4GB memory card anda akan terasa sangat kecil kalau digunakan untuk merekam video. Ada baiknya sediakan memory card tambahan atau harddisk external untuk menyimpan hasil rekaman

BUY DSLR CAMERA FULL HD HERE:
- Canon EOS Rebel T3i 18 MP CMOS Digital SLR Camera and DIGIC 4 Imaging with EF-S 18-55mm f/3.5-5.6 IS Lens
- Sony Cyber-Shot DSC-HX100 16.2 MP Exmor R CMOS Digital Still Camera with Carl Zeiss Vario-Tessar 30x Optical Zoom Lens, 3D Sweep Panorama and Full HD 1080 Video
- Canon EOS Rebel T3 12.2 MP CMOS Digital SLR with 18-55mm IS II Lens and EOS HD Movie Mode (Black)
- Nikon COOLPIX P500 12.1 CMOS Digital Camera with 36x NIKKOR Wide-Angle Optical Zoom Lens and Full HD 1080p Video (Black)
- Sony Cyber-Shot DSC-WX9 16.2 MP Exmor R CMOS Digital Still Camera with Carl Zeiss Vario-Tessar 5x Wide-Angle Optical Zoom Lens and Full HD 1080/60i Video (Silver)
- Nikon D3100 14.2MP Digital SLR Camera with 18-55mm f/3.5-5.6 AF-S DX VR Nikkor Zoom Lens
- Sony Cybershot DSC-HX1 9.1MP 20x Optical Zoom Digital Camera with Super Steady Shot Image Stabilization and 3.0 Inch LCD
- Fujifilm FinePix HS20 16 MP Digital Camera with EXR BSI CMOS High Speed Sensor and Fujinon 30x Wide Angle Optical Zoom Lens
- Sony DSC-WX10 Cyber-Shot 16.1 MP Exmor R CMOS Digital Still Camera with 7x Wide-Angle Optical Zoom G Lens, 3D Sweep Panorama, and Full HD 1080/60i Video (Black)
- Kingston 16 GB Class 4 SDHC Flash Memory Card SD4/16GBET
- Kingston 16 GB Class 4 SDHC Flash Memory Card SD4/16GB
- LILLIPUT 668GL-70NP/H/Y 7" on-camera Field HD Monitor for DSLR with HDMI Ypbpr and Composite Input

2. Atur settingan sesuai kebutuhan
Jika anda ingin membuat video dalam resolusi standard (SD) maka aturlah video ke resolusi itu. Jika anda set ke resolusi HD, maka itu akan menyusahkan saja karena harus convert ulang ke resolusi SD, dan pastinya lebih boros memori

3. Sediakan batere cadangan
Ketika berada pada mode video, kamera DSLR pastinya lebih menguras daya batere. Jadi batere cadangan mutlak diperlukan disini.. :D

4. Perhatikan settingan framerate
Semakin besar framerate memang akan membuat gerakan di video halus. Tapi hal itu juga memperbesar ukuran file. Di indonesia, kita gunakan standard PAL jadi video tersebut bagusnya di set ke 25 fps.

5. Perhatikan durasi rekaman, jangan terlalu lama
Kamera DSLR memiliki sensor image yang sangat peka panas. Jika sensor ini sudah mencapai temperatur tertentu, maka akan di shutdown otomatis oleh kamera untuk melindungi sensor dari kerusakan. Usahakan untuk merekam maksimal 10 menit untuk 1 file video.
Dari sifatnya ini, maka kamera DSLR sangat pantang digunakan untuk merekam live event, yang mengharuskan kamera ON terus berjam-jam lamanya.

6. Perhatikan goyangan (shake) pada video
Kamera DSLR sangat rawan akan shaking pada rekaman videonya. Untuk meminimalisir goyangan, anda bisa menggunakan beberapa alat berikut ini:

Tripod Kamera

Monopod "Kaki Ayam"


SteadiCam Merlin


GlideCam


Jika video rekaman anda terlanjur goyang, anda bisa membaca postingan saya sebelumnya, memperbaiki rekaman video yang goyang (cari di video software blog ini).
Itu saja tips-tips penting yang perlu anda ketahui. Semoga artikel ini bermanfaat untuk anda.


Rabu, 19 Oktober 2011

Portrait Lights

In this article I will discuss the basic lights that are used by portrait photographers and what effect their have on the photograph.
  • Main Light
  • Fill Light
  • Hair Light
  • Background Light
  • Rim Light
  • The placement of Lights
  • Position of the Main Light

Overall Picture

Please meet Jane, she is not real, but she generously agreed to be the model for my explanation of the studio lights. On the picture below you can see the final setup with four lights.
Overall picture
Overall picture - all lights on


The Main Light

On the image below you can see only the main light. The main light is called in that way because it is the main source of light for the portrait. There are a few specifics about the light that you have to consider. First, usually, it is the most powerful light in the set. Second, the light defines the primary light pattern (such as Butterfly, Broad or Short Lighting, Rembrandt, Split Lighting and etc. - more on these patterns in the article "Basic Light Patterns"). Most of the times the main light should shine into both eyes of the subject and create definite catchlights, so the eyes would not look like two black holes. It is achieved by placing the light at 2 o'clock position (or 10 o'clock - depends on the side you want to cast the light on).
Main light
Main light

The Fill Light

The second most import light is the Fill Light. This light sometimes could be omitted (for dramatic look) or replaced by a reflector (i.e. on location), though the type of the source changes, but there is light anyway. The purpose of the light to soften the shadows that created by the main light source. Usually you would use the ratio 3:1 or 3:2 for portraits (where 3 is for the main light and 1 or 2 for the fill light). On the image below Jane is lit only by the fill light, which is placed a bit to the side and below of the camera. But you could use even the flash that is placed on the camera's hot shoe, in such cases it creates an additional catch light in the subject's eyes. I have to say that too many catchlights in the eyes could be unflattering. By the way, about catchlights, I know that some commercial photographers use a flash circle (somewhat bigger than the macro flash, when the flash is shaped as a circle around the lens), which creates unusual round catchlights.
Fill light
Fill light

The Hair Light & Kicker

This light serves to accentuate the subject's hair and somewhat separate the subject from the background. It is especially crucial when the background is dark and the subject's head could blend in with the background. The hair light is placed high above the subject (could be slightly off to either side) and directed behind the subject on the floor or in front, but you should be very careful not to create flares by spilling some light into the lens. The beam of the light should be very narrow; photographers usually use grids, barn-doors or some other light modifiers to narrow the beam of light. Be careful not to spill some light on the forehead or shoulders. The power of the hair light could be equal the main light or be less - better to judge by the subject's look in the photograph.
There is another light, which is very similar to the hair light - the Kicker, which is placed above the subject to either side and placed in such a way to cast the light on the side of the head or/and shoulder. Kicker is useful for subjects's with long hair, so the hair get better light. Another application is to illuminate the veil of a bride.
You can see this very faint representation of the hair light in the image below, unfortunately, Jane has sticky hair.
Hair light
Hair light


The Background Light

The other way to separate the subject from the background is to cast some light on the background and create a hot spot directly behind the subject's head - as you can see on the image below. Because of this kind of application - lighting the background - the light is name the Background light. This light is placed behind the subject (somewhere at the waist level), so no appliance is visible to the camera and directed to the background. The power of the light depends primary on the color and tone of the background. You should be careful not to create a very hot spot on the background, which could distract the viewer from the face of the subject.
Background light
Background light

The Rim Light

If you turn the background light 180 degrees and direct it on the subject, the light starts illuminating the hair, and it will create a halo around the subject's head. It is another way to separate the subject from the background and add somewhat divine look. I have not created an image for this light, because Jane's hair is very sticky and the halo won't be visible, but you should try!

The Placement of The Lights

Now you are familiar with the lights and their characteristics and applications. So, let's review the overall position of lights. On the diagram below I show the view from above, so you can see the placement of the lights relatively to the camera (which is shown in blue color and placed at the bottom of the image). One remark, you can control the ratio of main and fill lights by their distance to the subject.
Light placements - from above
The diagram below shows all the lights from the photographer's left side, and you can see where the lights are directed and their vertical position.

Light placements - from side
Once more we see Jane with three lights (without the background light).
Light placements - from front
Light placements - front view


Position of the Main Light

A few more words on position of the main light. How do you avoid that flat look of the subject's face and still preserve the catchlights in his/her eyes? In the position as shown below the face is very well illuminated, but such position of the main light results in a flatly lit face. The light fails to create any appreciable dimension.
Light is too low
Light is too low
Let's move the light higher. With this position of the light the face has a good 3D look, however the eyes recede back into the sockets, the nose steps forward and the chin becomes more prominent (because of the cast shadows). But the shadows in the eye sockets completely hide the eye, there is no light and the effect is the lifeless and dull face.
Light is too high
Light is too high
To get the catchlights in the eyes we have to lower the light a bit (10am or 2pm level/position) and let the light touch the eyes and create these marvelous reflections.
Correct position of the light
Correct position of the light 

Photography Tips - Motion Photography


Motion Photography 
 
There are countless situations in film photography where motion plays a role. As such, there are a few motion photography tips and techniques that may be utilized during motion photography. You may want to capture frozen motion photography without any blur or you may decide to have the entire scene in motion blur photography. Ultimately, the choice is yours. This portion of the guide to photography will discuss how to appropriately capture motion with a few scenarios and the settings of your film camera and shutter speed to do so.

Setting the Shutter Speed for Motion Photography

The key photography tips for motion photography is a firm understanding of the shutter speed and the fast or slow shutter speed setting. If you hope to capture one frame of frozen Frozen Motion Photography Film Photo Technique motion with little or no blurriness from the movement of your subject, you will need to use a fast shutter speed such as 1/500 or faster. Of course, with such a fast shutter speed you will need to set a large
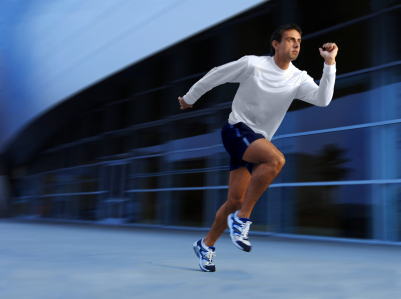
 aperture opening. This will result in shallow depth of field. If you do not want to have a shallow depth of field you will need more light to achieve captured motion. Obviously, this will take a few practice rolls of film to help you learn.
If you want to motion blur everything in the attempt to convey how fast the subject is moving then a slow shutter speed will be needed. Typically, anything below 1/60 for your shutter speed setting will allow this to happen. This basic photography technique often results in a mixture of colors, or black and white tones, as it will blend the colors together to create a painterly look. Blurring the subject in this manner is a rare technique used in photography as most will prefer the subject to be in sharp focus. Alternatively, you can use a technique called panning to capture motion and show the speed of motion.

Panning Photography Tips for Capturing Motion

Panning your camera is typically done with the use of a tripod, but can be done with a hand held camera. This photography technique is difficult to master, as it requires you to follow Blur motion photography - panning photography techniqueyour subject with the film camera at the same speed. You will need to set your shutter speed dial to a slow speed. Upon pressing the shutter release button of your camera, you will have to follow your subject as it moves. If successfully done, you will have an image with the subject in focus and a motion captured background. The effect looks similar to shallow depth of field but with movement.
You can also do the reverse of panning and allow the background to have sharp focus while movement is blurred. This technique works well where the background is more important than the moving subject or if you want to show the rush of traffic in the morning in a big city. The cityscape is left in focus while the cars and pedestrians are blurred to show how busy the city can be. This basic photography technique requires a slow shutter speed and a tripod. Simply allow your film to expose for your set amount of time and everything moving will become a motion blur.

Landscape Photography For the Serious Amateur

I’ve been into landscape photography for a couple of years now. It’s a fantastic hobby and hugely rewarding, but also has a bit of a learning curve. While I would not consider myself anywhere near a pro at this stage, I’ve picked up on a few useful things here and there. Below are some tips which I hope others who are just starting out in the world of landscape photography will find useful.
Why You Should Research Your Locations
If you are planning a photography trip then it’s important to do some research beforehand. Use the internet to find as much information as you can about your destination. Try to identify potential places of interest and find out the best times of the year to go – some places are much more photogenic in certain seasons while others look great all year round. Try to avoid peak tourist seasons though, as busy places mean more people to get in the way of your shots.
There are some great tools to help you prepare for your trip. Google Maps and Google Earth allow you to get a good idea of exactly how things will look and, in some cases, even enable you to compose your shots from the comfort of your computer! Not all locations have detailed views available but at the very least you can get a rough idea on potential spots to visit.
Another great tool for landscape photographers is The Photographers Ephemeris. This piece of software will tell you the exact time of sunrise, sunset, moonrise, and moonset at any given date for any location in the world. Not only that but it will also show you the direction that the sun and moon will be at those times. By knowing exactly where the sun will rise or set, you can plan your shots accordingly.
Whether you are planning a trip or shooting locally, have a look at photos that other landscape photographers have taken in the area. This will give you ideas on potential places to shoot, but don’t simply go and copy their photos, put your own take on them.
Do Some Area Scouting
Once your trip has started the research isn’t quite over yet. While the internet allows you to plan and prepare for your trip, nothing beats being on location in terms of finding the best spots to take photos from. Explore the area in the middle of the day when the light is too harsh to take photos. Doing this enables you to pre-visualize your shots and get some compositions in mind before the actual shoot. The last thing you want to be doing when the light is right is desperately trying to find some good compositions.
This is the most time-consuming and tedious part of a photography trip but unless you have a guide or know the area well, it’s a necessary evil.
Getting Great Composition
Once you have found a good location you still need to decide how to compose your shot. This is a very subjective area and it’s quite hard to describe what makes a good composition and what doesn’t. The best photographers just seem to have ‘a good eye’ for a shot – an innate ability to frame a scene in such a way as to engage the viewer and take the shot from the best possible angle. There are ‘rules’ that you’re supposed to follow, but some of the most amazing photos break these rules so it really comes down to each individual photo. However, keep these guidelines in mind when composing your photos:
  • Avoid clutter. Only include things in the frame that you want to present to the viewer. The best photos are clean and simple. If there are unwanted items in the way, such as power poles, cars, roads, buildings etc, try a different angle to hide them from view. Small things can be cloned out in post-processing but larger items will just distract the viewer.
Simple composition example
Simple compositions are often the best.
  • Include foreground interest. Don’t take a photo of a sunset and rely on the colorful sky to make your photo interesting. Foreground elements such as rocks, water, etc help to balance out the photo and also draw the viewer into the shot.
Example of foreground interest
A collection of rocks can make for great foreground interest.
  • Leading lines are a great way to draw the eye into the photo. Piers, jetties, and roads are obvious examples but also keep an eye out for interesting rock formations.
Example of leading lines
Using rocks to create leading lines.
  • Avoid placing the horizon or the focus of the photo in the dead center. Use the rule of thirds as a guide in framing your shot.
Don’t forget to treat all of the above as guidelines only. Rules are meant to be broken!
Waiting for the Light
Once the hard work of scouting has been done, it’s now a matter of turning up to your chosen location and waiting for the right time to click the shutter. This is, however, when things become out of your control and you are completely dependent on Mother Nature.
The best times for taking photos are the hours around sunrise and sunset, commonly referred to The Golden Hours by photographers, as these are when the light is at its best. During the day, outside of these hours, the light is usually too harsh and flat, resulting in washed out colors and boring photos.  There are exceptions of course, but most good-quality landscapes would be taken within the Golden Hours.
Once you have set up your shot, it’s just a matter of waiting for the light. Easier said than done! Some days (actually a lot of days), Mother Nature just does not want to play ball and the spectacular sunrise or sunset you are expecting never eventuates. This is, in my opinion, the hardest thing about landscape photography – no matter how much effort you put into planning and preparation, no matter how good your gear is, and no matter how skilled you are as a photographer, if the light is not right then you won’t get any good photos.
Those days are hard to take – coming back empty-handed after getting up at 4am for a sunrise shoot is never fun – but when things come together those days are quickly forgotten. There is no better feeling for a landscape photographer than when the light is good and you capture those magic moments with your camera.
Moeraki Boulders at sunrise
It’s all worth it when everything comes together.
Types of Lighting
There are different types of lighting, depending on where the sun is. The type of lighting you use is sometimes dictated by the scene you’re trying to capture, however at other times it offers you a variety of compositional choices and therefore lighting. It’s generally accepted that side-lighting – where the sun is coming from either the left or right of camera – is the most desirable for landscapes. This is due to the contrast between light and shadow caused by the directional light which adds depth to your photos. However front- and back-lighting, where you shoot directly away from or into the sun respectively, can also produce nice photos.
I tend to shoot directly into the sun in a lot of my photos as I find that is generally the direction where the most intense colors occur. To do this it’s best to wait until the sun is very low in the sky or below the horizon to avoid lens flare. With the sun higher in the sky, side-lighting is the best approach.
Example of side-lighting
The side-lighting here produces long shadows adding shapes and texture to the photo.
Example of front-lighting
Front-lighting can make clouds really stand out.
Shooting into the sun example
Shooting into the sun often produces dramatic results, if the flare is controlled.
Gear
One of the things I get asked a lot, especially by non-photographers, is what camera and lens I use. To me it’s a bit of a strange question – a bit like asking a painter what brand of brushes they use, or a builder what kind of hammers – but I suppose it’s understandable. The fact of the matter is the camera and lenses don’t make a huge difference in terms of the end result. Yes it’s true that high-end cameras produce higher resolution images with less noise, expensive lenses give you slightly sharper images etc, but unless you are making huge prints or pixel-peeping then they aren’t that important.
For the record, I currently use a Canon 40D and the lenses I use the most often are my Sigma 10-20 and Tamron 17-50. However some of my earlier shots were taking with a Canon 350D which has much lower specs than any entry-level camera available today yet still produced more-than-acceptable results.
Shot taken with Canon 350D
Shot taken with a Canon 350D.
A tripod is an essential piece of equipment due to the fact that many shots will be taken in low light, resulting in shutter speeds that are too slow to hand hold. Other benefits of a tripod include allowing you to set up and compose a shot in advance, and also the ability to bracket your exposures (taking multiple shots of the same scene with different exposures).
Bracketing exposures is important when it’s not possible to capture the whole range of light in a single shot. For example, at sunrise and sunset the sky is usually several stops brighter than the foreground. Often the difference in brightness is too much for the camera to capture so compromises are made. Either the shadows are preserved at the expense of highlights or vice-versa – either way some details are lost.
By taking multiple exposures of the same shot, you can use post-processing techniques such as HDR or exposure blending to merge your exposures back into one, and for this it’s essential the camera doesn’t move in between shots – that’s why a tripod is so important. Almost all DSLR’s will have an Auto Exposure Bracketing (AEB) option that can be turned on via the menus.
HDR example
A HDR image generated using 3 exposures.
By far my most-valued pieces of equipment are my filters – in particular my graduated neutral density (GND) filters. GND filters are rectangular filters that are half clear and half dark, with a graduated transition in between. The dark part is neutral in terms of color and its purpose is to reduce the intensity of the light in that part of the image (usually the sky). They come in various strengths (ranging from 1-stop to 4-stops) and are also available in soft-edged and hard-edged varieties. The soft-edged ones have a more gradual transition line and are more suitable when the foreground overlaps with the sky (e.g. mountains), whereas the hard-edged ones have a more abrupt transition line and suit scenes where the foreground and sky don’t overlap much.
I use GND filters in almost all of my sunrise/sunset photos, with the 3- and 4-stop hard-edged ones being the most-used. These filters balance out the difference in intensities between the sky and foreground and allow me to capture most shots in one exposure without needing to use HDR or exposure blending. I find it’s far more satisfying to capture an image in-camera rather than having to spend extra time in front of the computer to get the result I want.
GND filters
GND filters. Hard-edge (left), soft-edge (right).
Shot taken with GND filter
A 3-stop hard-edged GND filter balances the bright sky and darker foreground.
Another filter I use is a circular polarizer (CPL). The two primary uses of a CPL filter are to reduce glare (usually from water) and to enhance saturation in colors (e.g. blue skies, autumn leaves). This is one filter that cannot be replicated in post-processing.
Example of CPL filter
A CPL filter can maximize the colors of  autumn leaves.
The final type of filter I use is a solid neutral density (ND) filter. This differs from a GND filter in that the whole filter is dark and its purpose is to reduce the amount of light across the entire image rather than just a portion of it. An ND filter is typically used to achieve a slower shutter speed than the light would normally allow. This is particularly useful for shots of flowing water as longer shutter speeds give water that smooth, ethereal look that a lot of photographers like.
ND filters come in different strengths with the most common being 3-stops (this reduces the amount of light hitting the sensor by 8 times). However there are also much stronger ones available such as the B+W ND110. This filter is 10-stops in strength, reducing the amount of light by 1000 times! These strong ND filters offer some creative opportunities to shoot in lighting conditions that would normally be too harsh for landscape photography, especially when there are fast-moving clouds or flowing water.
Example of using 10-stop ND filter
Lake Hayes, Queenstown. Taken with a 10-stop ND filter in bright light.
Example of 10-stop ND filter
Using a 10-stop ND filter at sunrise allows for long exposures.
Post Processing
Because I shoot all my photos in RAW mode, they all have to be processed in some form or another. RAW images are, as the name implies, the raw, unprocessed information that the camera has captured. This is in contrast to shooting in JPEG mode where the camera automatically converts the RAW image into a JPEG file and performs post-processing (such as sharpening,  saturation, contrast etc) for you. When people boast about their photos being ‘straight out of the camera’ or ‘untouched’ it usually means that they shoot in JPEG mode and let the camera process their photos for them. While it’s certainly a convenient option, and for certain types of photography where fast turnaround is required, a necessity, I think it’s better to take control of this processing yourself.
The main benefit of shooting RAW is that you have more information to work with. Once an image is converted to JPEG a lot of information is discarded and can never be retrieved, whereas a RAW file contains every single piece of information the camera was able to capture. This gives you more leeway to make exposure adjustments and also means you can process the same file in different ways. This can be useful when your post-processing skills improve (or new software techniques become available) and you want to reprocess older photos. RAW files are sometimes referred to as ‘digital negatives’.
The amount of post-processing you do is a personal choice. Some people prefer to do minimal processing such as  sharpening, noise reduction and minor enhancements to contrast, curves,  and saturation. Others like to use more of an artistic license to give their photos a surreal look (this is particularly true with a lot of HDR-enthusiasts). Personally I prefer to let the natural light do the talking rather than overpower it with post-processing. However, when the natural light was average to begin with or if I’m after a different look then I may experiment with different processing techniques. The majority of my shots would fall into the minimal post-processing category.
Muriwai sunset
Good light means minimal post-processing.
Heavy post-processing example
Getting more creative with post-processing.
Summary
Taking good landscape photos is pretty easy when you think about it. It just comes down to being at the right place at the right time, and knowing some basic techniques to capture the scene. The most important thing is to get out often and take photos. The best way to learn is by making mistakes, but don’t forget to have fun while you’re doing it!
 

capturing your memories Copyright © 2011 -- Template created by O Pregador -- Powered by Blogger