Jumat, 02 Maret 2012

Komposisi – Aspek Rasio

by Enche on October 25, 2011
Aspek rasio adalah rasio panjang dan lebar sebuah foto. Jika panjang dan lebar foto sama, maka aspek rasionya 1:1. Di kamera digital saku, aspek rasionya biasanya adalah 4:3, demikian juga kamera micro four thirdsnya Olympus atau Panasonic. Di kamera DSLR Canon, Nikon, Sony, Pentax, aspek rasionya 3:2. Pilihan aspek rasio sangat mempengaruhi komposisi foto, tapi ironinya banyak orang yang menyepelekannya.
Biasanya, kita akan mengkomposisikan foto sesuai dengan apa yang sudah di set kamera kita, sehingga komposisi foto jadi kurang pas. Di beberapa kamera, kita bisa mengganti aspek rasio, di sebagian lain tidak bisa, tapi kita bisa mengkrop foto di software pengolah foto seperti Photoshop.
3:2 adalah aspek rasio yang biasa kita dapati di kamera DSLR digital. Aspek rasio ini umumnya baik untuk foto horizontal seperti pemandangan.
4:3 adalah aspek rasio yang di cap paling alami dan paling enak di lihat baik secara horizontal dan vertikal. Tidak seperti 3:2, saat foto vertikal, aspek rasio ini tidak terlalu tinggi, sehingga tidak melelahkan mata. 4:3 cocok dipakai untuk foto berorientasi portrait.
1:1 adalah aspek rasio bujursangkar. Di masa lalu, aspek rasio ini ditemukan di kamera large format. Aspek rasio ini cocok untuk foto pola dan detail. 1:1 disebut juga aspek rasio yang netral karena tidak berorientasi horizontal atau vertikal.
16:9 adalah aspek rasio yang sering kita jumpai di film. Aspek rasio ini terkesan lebar dan agak pendek. Biasanya cocok untuk foto pemandangan atau membuat foto berkesan sinematik (seperti film).
5:1 adalah aspek rasio yang disebut juga panorama karena cakupannya yang sangat lebar. Biasanya cocok untuk foto pemandangan.
Dengan menyadari aspek rasio mempengaruhi komposisi, kita bisa memilih aspek rasio yang tepat sehingga foto kita lebih enak dilihat.
Aspek rasio 1:1
Aspek rasio 1:1
Aspek rasio 4:3
Aspek rasio 4:3
Aspek rasio 16:9
Aspek rasio 16:9

Canon 5D mark III vs Nikon D800

by Enche on March 2, 2012
Akhirnya, Canon 5D mark III telah diumumkan. Kamera ini adalah kamera DSLR berkelas profesional yang di desain untuk profesional atau fotografer amatir yang mendambakan kamera yang relatif ringan tapi memiliki kualitas yang tinggi.
nikon-d800-vs-canon-5d-mk3
Canon 5D mark III akan menantang Nikon D800 yang diumumkan beberapa waktu yang lalu. Sekilas, 5D mark III terlihat lebih seimbang daripada  Nikon D800. Tahun ini, Canon menekankan ke kecepatan dan kualitas foto daripada besarnya resolusi foto. Nikon memilih meningkatkan ukuran foto dan ketajaman foto.
Tiga sampai empat tahun yang lalu, Nikon menekankan kepada kecepatan dan kualitas foto di kondisi cahaya yang kurang baik. Karena ukuran foto hanya 12 MP, banyak pengguna Nikon meminta Nikon membuat kamera yang dapat membuat foto yang berukuran lebih besar. Maka dari itu, D800 merupakan jawabannya. Nikon D800 memiliki 36 Megapixel, tiga kali lebih besar daripada Nikon D700.
Di sisi lain, Canon 5D mark II memiliki 21 MP, yang cukup besar untuk cetak ukuran besar, tapi Canon 5D mark II kurang begitu cepat dan kurang bagus di ISO tinggi (lebih dari 1600). Hari ini, Canon menjawabnya dengan meluncurkan 5D mark III. Kamera ini lebih baik secara keseluruhan dari Canon 5D mark III, dari kecepatan maupun kualitas foto.
Saya kira jawaban Canon lebih baik daripada Nikon karena 5D mk 3 lebih seimbang dan serba guna. Kamera ini cocok untuk berbagai jenis fotografi dari fotojurnalis, travel, portrait, model, pemandangan, fashion dan lain lain.
Di pihak lain, Nikon D800 lebih terbatas kepada orang-orang yang ingin membuat foto terbesar yang dapat dibuat oleh kamera DSLR. Kamera ini lebih ditujukan kepada jenis fotografi yang lebih spesifik, yang mementingkan ukuran foto untuk dicetak besar atau untuk menangkap detail sejelas-jelasnya. Jenis fotografi yang cocok yaitu fotografi komersial dan fotografi pemandangan.

Kelebihan Canon 5D mark III

  • Kecepatan foto berturut-turut lebih cepat 6 foto per detik vs 4 foto per detik
  • Rentang ISO lebih lebar 100-25600  vs  100-6400
  • Layar LCD sedikit lebih besar 3.2 inci dengan resolusi 1 juta titik
  • Titik fokus 61 buah (41 diantaranya titik fokus yang bertipe silang lebih sensitif) vs titik fokus 51, diantaranya 15 titik cross-type

Kelebihan Nikon D800

  • Ukuran foto lebih besar 36 MP vs 22MP
  • Kompatibel dengan lensa DX (Ukuran foto akan menjadi 15.5 MP)
  • Shutter lebih tahan lama (200 ribu jepret vs 150 ribu jepret)
  • Ada pilihan versi D800E yang lebih tajam
  • Memiliki lampu kilat built-in
  • Lebih murah sekitar 4-5 juta Rupiah

Seri

  • Jendela bidik 100%
  • Processor HDR
  • Tahan air dan debu
  • Dua lubang untuk kartu memori (kartu CF & SD)
  • Bisa merekam video HD, dengan durasi yang cukup lama (30 menit)
  • Hampir sama besar
Berita bagusnya adalah, Nikon D700 dan Canon 5D mark II mungkin akan di diskon dan merupakan kesempatan yang baik untuk membeli salah satu dari kamera tersebut. Meskipun D800 dan 5D mark III akan tersedia dalam waktu beberapa bulan lagi, tapi kamera semacam D700 dan 5D mkII masih merupakan kamera yang sangat bagus.
- Canon 5D mark III contoh foto dari Canon Japan. Nikon D800 contoh foto dari Nikon Imaging USA
sumber ; http://www.infofotografi.com

Sabtu, 14 Januari 2012

How To Use Zoom Blur To Add Action In Your Photos


 Most of us own a zoom lens of one type or another. While I have no specific stat, I’ll say 98% of us do. It seems like a good number and might even be low.

With nearly all of you armed with this type of lens, let’s take a look at a fun way you can add action to your photos. The technique is actually quite simple but takes some practice to master. It is known as zoom blur; blur caused by activating the zoom feature on your lens while the shutter is open. NOTE: While the same effect can be achieved by physically moving your camera closer or further from a subject while shooting, we’ll stick with the zoom feature in this post.
There are three factors that are most important when using zoom blur:
  • Where you start the blur (zoomed in or zoomed out)
  • How much zoom travel
  • How long you spend with the shutter open

Where You Start The Blur

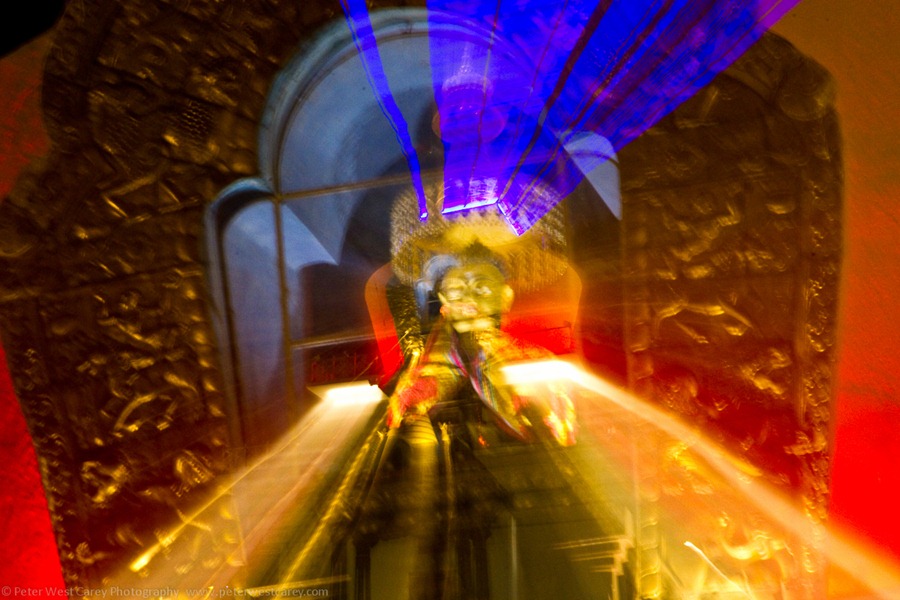
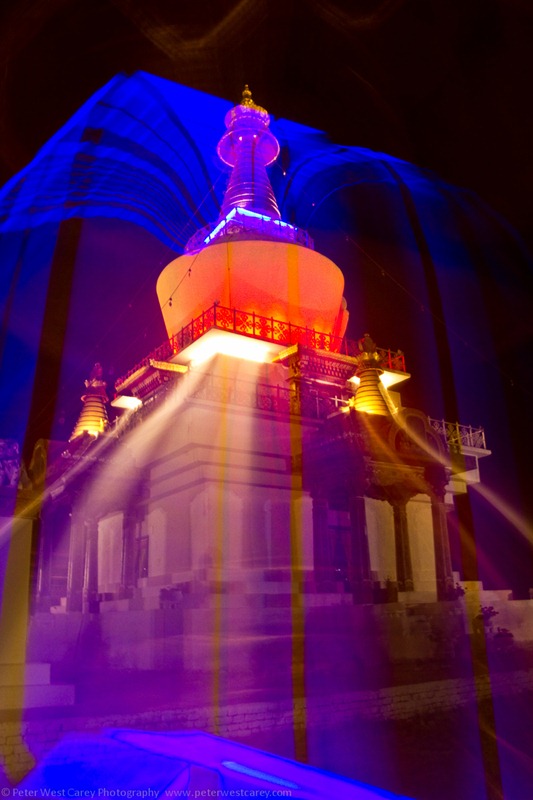
Where you start has a big impact on the outcome of the photo. You can either start zoomed back or zoomed in. My preference is typically to start zoomed out and I’d suggest it for anyone starting out. The reason is it typically allows for the clearest image of the subject before the zoom blur is added. It also gives more of a feeling of the object moving away from the photographer. Here by example, are two different shots of the Memorial Stupa in Thimphu, Bhutan. First, going from zoomed in to zoomed out. (Click on each image for a larger version.)
PeterWestCarey-Bhutan2011-1027-8718
This image is dominated by the golden frame around the statue as compared to the full stupa in which is sits. This is mostly due to the shutter length (1.6 seconds) and spending more time zoomed in than in transition. For a second example, this shot was started zoomed out and then, using a tripod, I zoomed straight in.
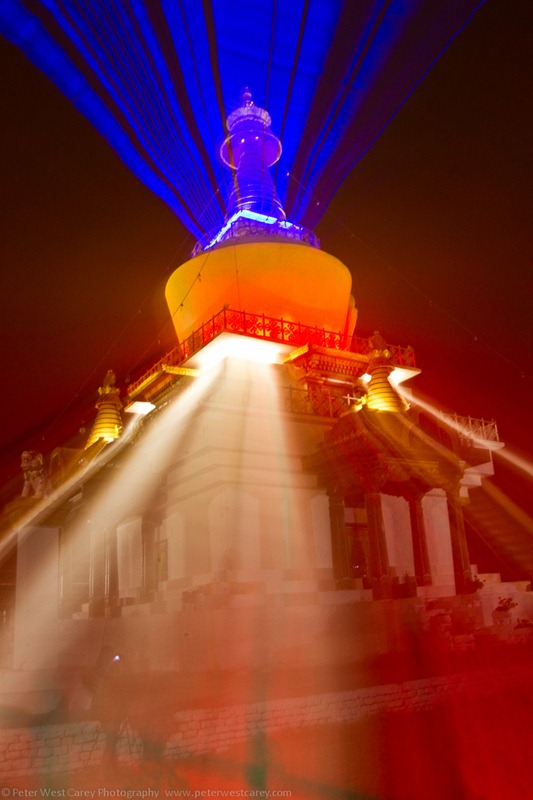
PeterWestCarey-Bhutan2011-1027-8741
This shot was 2 seconds long and I allowed more time at the beginning to burn in the stupa image before zooming in. Allowing more time toward the main subject, versus time spent zooming, will allow your main subject to stand out more.

How Much Zoom Travel

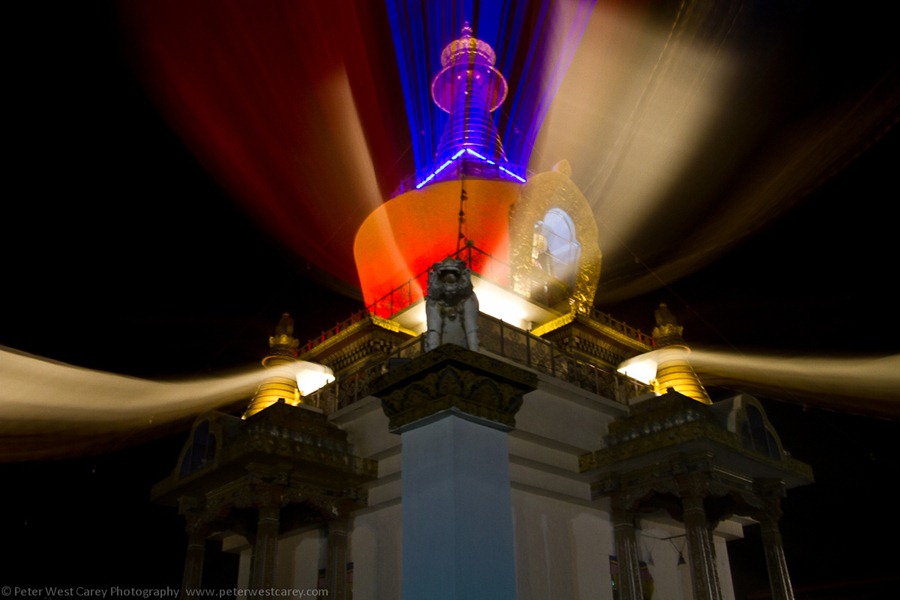
Next, it matters how  much you zoom while the shutter is open. For the shot above, I wanted the lights to extend all the way off the screen. But it didn’t quite work as too much light filled the screen for my liking, obscuring the  stupa. Instead, I decided to zoom only part of the way in, hoping it would allow for more of the scene to be visible. I also started further zoomed in to see more of the base of the stupa.
PeterWestCarey-Bhutan2011-1027-8728


I am also helped here by the center point of the zoom being lower than the brightest lights. This helps when the scene is brightly lit and the light can have a tendency to wash out areas of the subject. For instance, the statue in the center is not blurred because the zoom was fast enough to not let too much of its light be exposed.

BONUS TIP: Give It A Bit Of Movement

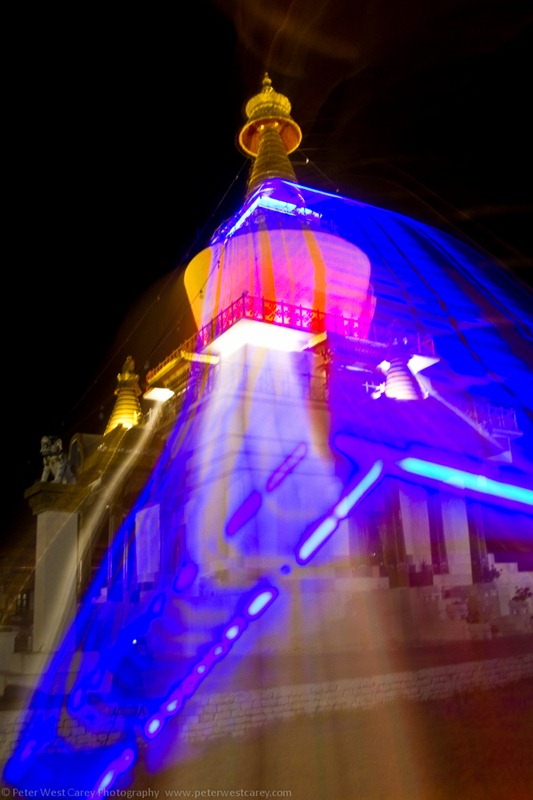
Especially when dealing with lights at night, adding in a bit of movement can give some interesting effects. For instance, in the examples below I panned slightly up or down to change the path of the blurring lights.

PeterWestCarey-Bhutan2011-1027-8742
PeterWestCarey-Bhutan2011-1027-8736
I will be the first to admit these images aren’t stellar, put-on-a-magazine-cover images. They’re about experimenting and having fun. At times though, with practice, zoom blur can produce some remarkable results as seen in the examples below from Flickr.
Copyright Ernst Vikne

Copyright Balamurugan Natarajan
Copyright Heather Wizell

Shooting Products and Video Using Home Depot Lighting

We had a very tight budget, and I had recently done a behind the scenes video on creating and lighting a unique scene with just Home Depot lights. So, I thought why not do the same thing for the ONE project.

Final Result Samples


Samples from the final set of stills – Shot sRAW on 5D Mark II w/ 50mm @ F/4

The Setup

Step 1 – Flooring and Wall Tiles ($1065 Total cost)

The first step was setting up the flooring and the wall tiles. Interestingly enough, this was actually where the majority of our budget was spent. But, we figured that we would be using this set in future videos, so it wouldn’t be a one time cost.
The entire space is 10×10 feet. So we purchased 100 square feet of wood flooring tiles from Home Depot (which cost around $200) along with 200 square feet of Seesaw Wall Flat tiles to cover both walls. For some reason, these cardboard molded wall flats cost $86 per box and it took 10 boxes to cover both walls. So, yeah, that is where the majority of our budget went as it cost $860. To the attach them to the wall, we simply used 4 pieces of double sided tape per tile.

Step 2 – J.C. Our Lighting Dummy

Whenever I am doing scene setups, I place a lighting dummy where my subject is going to be in order to shape my light. It isn’t reasonable to have a person stand in for 60 minutes as I sit there and mold and shape our light. So, I pop in J.C., our lighting dummy, to give me a nice example of how the lighting is changing as I add and modify each light.

Step 3 – Wiring the Set ($50 in wires and strips at Home Depot)

Concealing cables on a set is always a challenge, especially when you are shooting wide. Luckily, in this video we didn’t shoot wide enough to see the flooring. But, for future videos I knew that we would. But, with the wood tile floors we had a simple solution, we simply ran the cables behind the tiles along the edge of the wall then pushed the wood flooring against the cables to pinch and conceal it against the wall.

Step 4 – Husky Daylight Work Lights ($50 each at Home Depot)

We used two Husky Florescent work lights as uplights to bring out the texture of the wall tiles. We used florescent daylight temperature lights because we wanted the background to be a nice shade of blue, while we white balanced to tungsten that would be used on the subject.


The image above shows the placement of the uplights on the floor. Each is evenly spaced from the corner of the set.

Step 5 – Workforce Tungsten Work Light Stand ($35 at Home Depot)

The next light in our setup is a twin head Workforce Work Light light which we use as a rim light on our subject off camera left.


While using work lights is cheap, there are downsides. Some of which include the heat, the lack of power control, as well as directional control. While we can’t change the first two, we can change the direction of the lighting. To prevent the tungsten light from hitting the uplit walls, I added on a little cardboard GOBO (Go In Between Object). Don’t worry, the light doesn’t get hot enough to burn the cardboard, though just to be safe, I wouldn’t leave the set turned on while I went to do my grocery shopping.

Step 6 – Workforce Tungsten Work Light ($15 at Home Depot)

To define the right side of the subject, I added an additional tungsten Workforce light to camera right.

Step 7 – Tungsten Modeling Light (Can use the $35 light used above)

Since we have modeling lights sitting around the studio, I didn’t need to spend more money on the work lights for our set. So, while we are using a modeling light as the main light, this would look and work exactly the same with the dual light stand used above. The benefit to using a modeling light is that I have a nice little barn door to easily control the direction of the light.
This light is placed directly to camera right and is used as the main light on our subject.

Step 8 – Softening the Main Light ($30 Scrim)

To soften our main light, we are using a standard scrim out of a simple silver reflector kit that can be purchased for $20 – $30 pretty much anywhere. The purpose of softening this light is to prevent hot spots and shine on the subjects face. This is particularly useful as our set is getting quite hot (literally) because of the amount of tungsten lights in close proximity. So, keeping that main light soft is going to help conceal any oil/shine on our subjects face.


The scrim is placed on a stand directly in front of the main modeling light as shown above.

Finished Set


With the ambient room lights off, you can see the final look of our set above. At this point, we are ready to bring in our real subject, and make a few fine tweaks with the light positioning in order to adjust the exposure and any stray bits of light.
Hope you guys enjoyed this little behind the scenes look. To check out this behind the scenes video as well as our other tutorials be sure to subscribe to the SLR Lounge YouTube Channel.

Jumat, 13 Januari 2012

5 Tips To Transform Your Photography With Long Exposures


Employing long exposure photography techniques is a great way to create an image that makes others go “Wow!”.  If you’re unfamiliar with long exposure photography the major ingredient needed is low light conditions, which will require your camera to expose for longer periods of time. In fact it’s even possible to use filters to reduce the amount of light that comes through your lens so as to produce long exposures even during the brightest times of day.  Long exposures enable photographers to create an abstracted or surreal visual experience as opposed to reproducing a scene as we might see with our naked eye. In this regard long exposures allow you to artistically create something from a subject or scene that might otherwise seem ordinary with more standard photographic techniques.  With that in mind here are 5 tips to transform your photography with long exposures:

1. Create Atmosphere

Use long exposures to create an ethereal atmosphere. Weather conditions are often thought of as static, but in reality they shift and change slowly.  In many instances these changes occur too slowly to be held in our visual memory, but our camera can record these changes. Misty, foggy or smokey scenes can be created with moving clouds, surf, etc.

2.  Discover Hidden Movement

We are often so rushed that we seldom pause to take note of slow moving subjects. Once you start to look for slow moving subjects you quickly open a door to a new world of photo opportunities. Clouds, shadows, stars, plants and even people or animals make great long exposure subjects.

3. Create Using A Canvas of Light

While your camera shutter is open your sensor or film is in essence a canvas. Normally that canvas is open very briefly but with longer exposures the light running over your sensor acts a brush. If you let a scene unfold before you with your shutter open it is “painted” onto the sensor yielding blurs of light. If you work in an environment where there is little light you can manually paint light into a photo with strobes, flashlights, cell phones, etc. to create a unique image.

4.  Alternate Reality of Color

Back in the days of film there was a phenomenon where the color in your image could shift in long exposures from reciprocity failure. Different film types would experience reciprocity failure at different exposure times and produce varying types of color shifts. For many photographers these color shifts were seen as something to avoid, but many artist have employed this phenomenon to create very neat photographs. If you’re still shooting film this may be something you want to experiment with. If you’re shooting digital you can get color shifts by creating or using pre-made presets in Photoshop or Lightroom.

Note: This was taken with Fuji Velvia film whose reciprocity characteristic is to shift colors toward green hues.

5. Photograph the Ordinary to Make the Extraordinary

When you show someone something new that is under their nose all the time it reawakens their interest in it. Highlighting one or a combination of the visual effects previously discussed with long exposures of ordinary scenes will catch eyes. To find that eye catching photo you’ll need to experiment though as the net effect(s) of a long exposure may not be apparent until you view it.


capturing your memories Copyright © 2011 -- Template created by O Pregador -- Powered by Blogger